Hyundai Elantra: Automatic Transaxle Control System / Underdrive Brake Control Solenoid Valve(UD/B_VFS) Repair procedures
| Inspection |
| 1. |
Turn ignition switch OFF. |
| 2. |
Remove the battery and battery tray.
(Refer to Engine Electrical System - "Battery") |
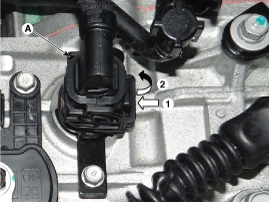
| 3. |
Disconnect the solenoid valve connector (A).
|
| 4. |
Measure resistance between sensor signal terminal and sensor ground terminal. |
| 5. |
Check that the resistance is within the specification. |
| Replacement |
If necessary replace the valve body or solenoid valves,
hydraulic adjustment is needed, replace the automatic transaxle
assembly.
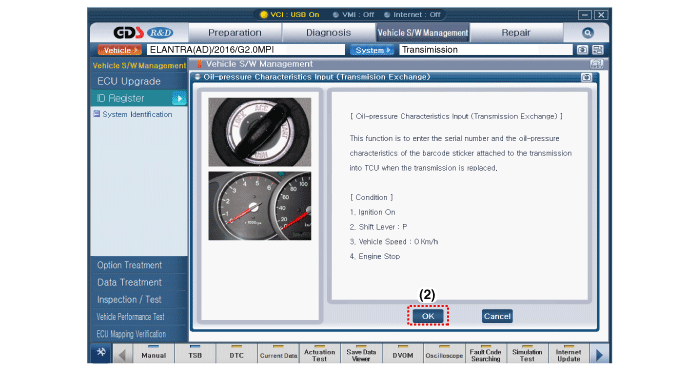
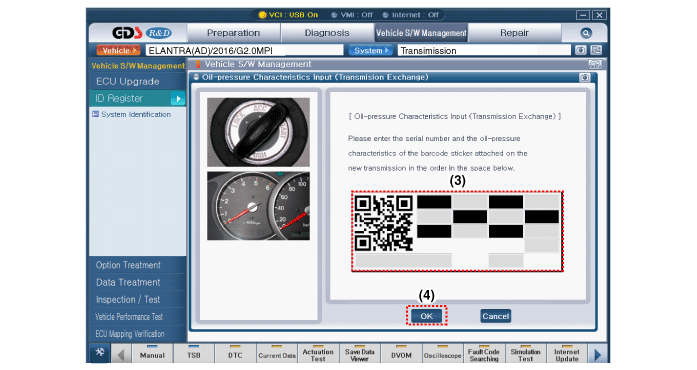
After the automatic transaxle assembly exchange, input the hydraulic calibration information of TCM. |

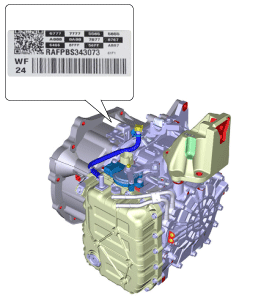
| 1. |
Perform the oil pressure characteristics input procedure.
• Oil pressure characteristics(bar code) location
• Oil-pressure characteristics input
(Transmision exchange)
|

 Underdrive Brake Control Solenoid Valve(UD/B_VFS) Schematic Diagrams
Circuit Diagram
...
 Overdrive Clutch Control Solenoid Valve(OD/C_VFS) Description and Operation
Description
•
Overdrive clutch control solenoid valve(OD/C_VFS) is attached to the valve body.
•
This variable force solenoid valve directly controls the hydraulic pressure inside the ...
Other information:
Hyundai Elantra AD (2016-2020) Owners Manual: Electronic Stability Control (ESC) OFF Indicator Light
This indicator light illuminates:
Once you turn the ignition switch or the Engine Start/Stop button to the
ON position.
- It illuminates for approximately 3 seconds and then goes off.
When you deactivate the ESC system by pressing the ESC OFF button.
For more details, refer to " ...
Hyundai Elantra AD (2016-2020) Owners Manual: Limitations of the system
The driver must be cautious in the below situations because the system may not
detect other vehicles or objects in certain circumstances:
The vehicle is driven in inclement weather such as heavy rain or snow.
The sensor is polluted with rain, snow, mud, etc.
The rear bumper where the senso ...
