Hyundai Elantra: Rear Door / Repair procedures
| Adjustment |
|

| 1. |
Remove the rear door trim.
(Refer to Rear Door - "Rear Door Trim") |
| 2. |
Separate the mounting plug hole (A) from the rear door module.
|

| 3. |
After loosening the glass mounting bolts, adjust the spacing
of the glass (A) by moving the glass from side to side and then tighten
the bolts.
|
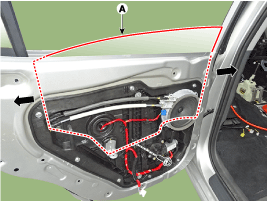
| 4. |
Check the glass for normal operation. |
|
| 1. |
After loosening the mounting screw, adjust the striker (A) by
moving it forward and backward or from side to side and then tighten
the bolts (B).
|
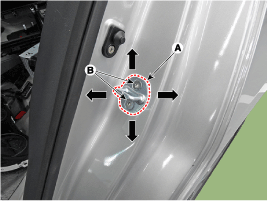
| 2. |
Tap on the striker with a plastic hammer to adjust the striker. The striker will not move much, but will give some adjustment. |
| 3. |
Hold the outer handle out, and push the door against the body
to make sure that the striker fits flush with the body. If the door
latches properly, tighten the screws and recheck. |
|
| 1. |
Check that the door and body edges are parallel.
|
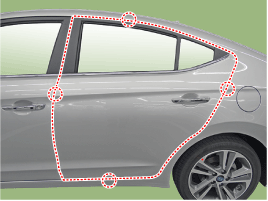
| 2. |
Place the vehicle on a firm, level surface when adjusting the doors. |
| 3. |
Adjust the hinges (A) :
|
| 4. |
Grease the pivot portions of the hinges indicated by the arrows. |
| 5. |
Check for water leaks. |
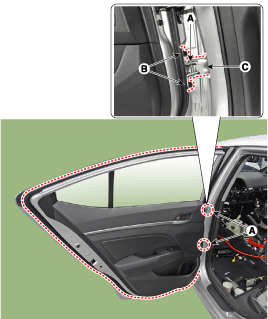
 Components and Components Location
Components
1. Rear door trim 2. Rear door belt inside weatherstrip 3. Rear door module 4. Rear door panel 5. Rear door delta inner cover 6. Holl plue7. Rear door belt outside w ...
 Rear Door Trim Components and Components Location
Component Location
1. Rear door trim
...
Other information:
Hyundai Elantra AD (2016-2020) Service Manual: Front Bumper
Components and Components Location
Components
1. Front bumper cover 2. Front bumper side bracket [LH]3. Front bumper side bracket [RH]
Front Bumper Cover Components and Components Location
Component Location
1. Front bumper cover
Front Bumper Cover Repair procedures
Replaceme ...
Hyundai Elantra AD (2016-2020) Owners Manual: Seat Warmers. Rear seat warmers
Front seat warmers (if equipped)
Seat warmers are provided to warm the seats during cold weather.
WARNING
The seat warmers can cause a SERIOUS BURN, even at low temperatures and especially
if used for long periods of time. Passengers must be able to feel if the seat is
becoming too warm so th ...
