Hyundai Elantra: ESC(Electronic Stability Control) System / Rear Wheel Speed Sensor Repair procedures
Hyundai Elantra AD (2016-2020) Service Manual / Brake System / ESC(Electronic Stability Control) System / Rear Wheel Speed Sensor Repair procedures
| Removal |
| 1. |
Loosen the wheel nuts slightly.
Raise the vehicle, and make sure it is securely supported. |
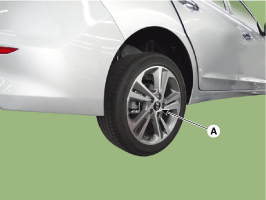
| 2. |
Remove the rear wheel and tire (A) from front hub .
|

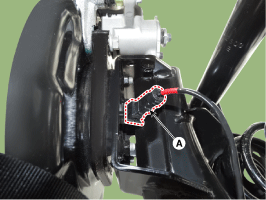
| 3. |
Disconnect the rear wheel speed sensor connector(A).
|
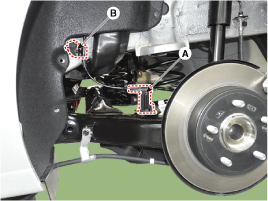
| 4. |
Loosen the mounting bolt and then remove the wheel speed sensor cable bracket (A) and (B).
|
| 5. |
Remove the rear seat back.
(Refer to Body - "Seat") |
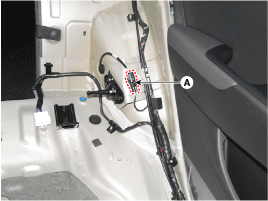
| 6. |
Disconnect the rear wheel speed sensor connector (A), and than remove the rear wheel speed sensor.
|
| 7. |
To install, reverse the removal procedure. |
| Inspection |
| 1. |
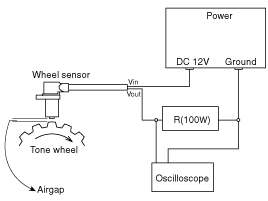
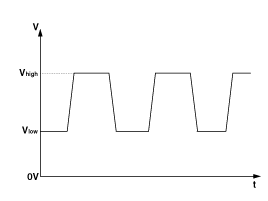
Measure the output voltage between the terminal of the wheel speed sensor and the body ground.
|
| 2. |
Compare the change of the output voltage of the wheel speed sensor to the normal change of the output voltage as shown below.
|
 Rear Wheel Speed Sensor Components and Components Location
Components
1. Front wheel speed sensor2. Front wheel speed sensor cable
...
 Autonomous Emergency Braking(AEB) System
Description and Operation
Description
-
AEB system is designed to help avoid a potential collision or
reduce its impact when drivers applies inadequate, delayed or no brakes
at all to avoid ...
Other information:
Hyundai Elantra AD (2016-2020) Service Manual: Components and Components Location
Component Location
1. Hood switch2. Burglar horn3. BCM4. Door lock / unlock buzzer5. Front door switch6. Rear door switch
...
Hyundai Elantra AD (2016-2020) Service Manual: Rheostat Repair procedures
Inspection
1.
Disconnect the negative (-) battery terminal.
2.
Remove the crash pad lower panel.
(Refer to Body - "Crash Pad Lower Panel")
3.
Disconnect the rheostat switch connector (A).
4.
Check for intensity of new rheostat switch. If the light
intensity of the lamps changes sm ...
© 2018-2026 www.helantraad.com
