Hyundai Elantra: Hood / Hood Latch Repair procedures
| Replacement |
| 1. |
Remove the front bumper.
(Refer to Front Bumper - "Front Bumper Cover") |
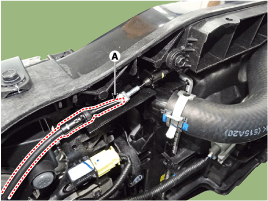
| 2. |
Loosen the mounting clips and remove the air duct (A).
|

| 3. |
Disconnect the hood latch release cable (A).
|
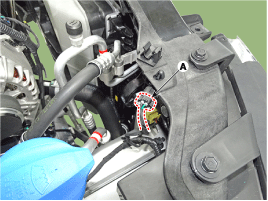
| 4. |
Disconnect the connector (A), then remove the wiring mounting clips.
|
| 5. |
Loosen the mounting bolts (A) and disengage the filer neck assembly.
|
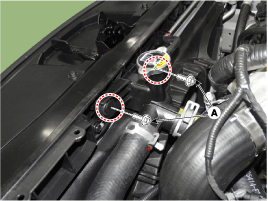
| 6. |
Loosen the mounting bolts and remove the hood latch assembly (A).
|

| 7. |
To intall, reverse the removal procedure.
|

 Hood Latch Components and Components Location
Component Location
1. Hood latch assembly
...
 Trunk Lid
...
Other information:
Hyundai Elantra AD (2016-2020) Owners Manual: Battery saver function, Headlamp delay function
Battery saver function
The purpose of this feature is to help prevent the battery from being discharged.
The system automatically turns off the parking lamp when the key is removed (remote
key) or when the driver turns the engine off (smart key) and opens the driver-side
door.
With this feat ...
Hyundai Elantra AD (2016-2020) Service Manual: Alignment Repair procedures
Front wheel alignment
•
When using a commercially available computerized wheel
alignment equipment to inspect the front wheel alignment, always
position the vehicle on a level surface with the front wheels facing
straight ahead.
•
Prior to inspection, make ...
