Hyundai Elantra: Lighting System / Head Lamps Repair procedures
| Head Lamp Aiming Instructions |
|

| 1. |
Inflate the tires to the specified pressure and remove any loads from the vehicle except the driver, spare tire, and tools. |
| 2. |
The vehicle should be placed on a flat floor. |
| 3. |
. Draw vertical lines (Vertical lines passing through
respective head lamp centers) and a horizontal line (Horizontal line
passing through center of head lamps) on the screen. |
| 4. |
With the head lamp and battery in normal condition, aim the
head lamps so the brightest portion falls on the horizontal and vertical
lines.
A : Vertical (High beam / Low beam)
|


| 1. |
Head Lamp (Low beam)
|

| 2. |
Turn the front fog lamp on without the driver aboard.
The cut-off line should be projected in the allowable range (shaded region)
|


| Removal |
| 1. |
Disconnect the negative (-) battery terminal. |
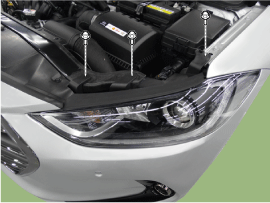
| 2. |
Remove the front bumper cover.
(Refer to Body - "Front Bumper Cover") |
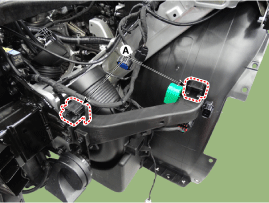
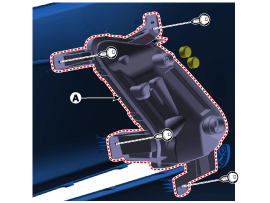
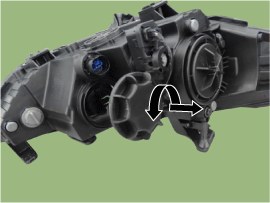
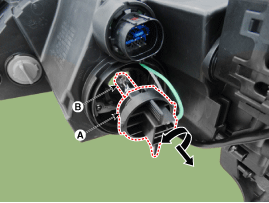
| 3. |
Disconnect the head lamp connector (A).
|
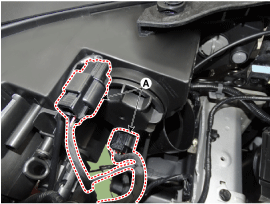
| 4. |
Remove the head lamp (B) mounting bolts.
|
| Installation |
| 1. |
Install the head lamp assembly after connecting the connector. |
| 2. |
Install the front bumper corver. |
| 3. |
Connect the negative (-) battery terminal. |
| Replacement |
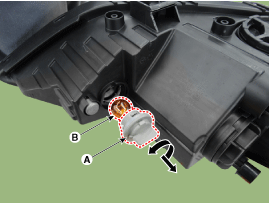
| 1. |
Remove the ignition key from the vehicle. |
| 2. |
Remove the bulb socket (B) and side marker bulb (A) from the lamp assembly.
|
| 1. |
Remove the ignition key from the vehicle. |
| 2. |
Remove the front bumper corver. |
| 3. |
Remove the front fog lamp assembly (A) after loosening the mounting screws.
|
| 1. |
Turn the head lamp power off. |
| 2. |
Remove the bulb socket (B) and turn signal lamp bulb (A) from the lamp assembly.
|
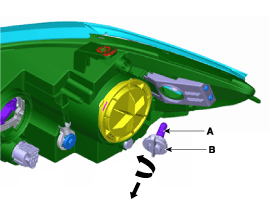
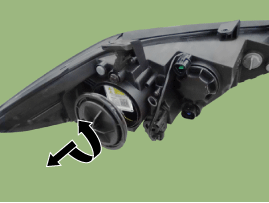
| 1. |
Turn the head lamp power off. |
| 2. |
Remove the bulb caps from the head lamp assembly after turning in the counter clock-wise direction.
|
| 3. |
Remove the head lamp low beam bulb (B) after removing the socket (A) from the head lamp assembly.
[Standard (Halgogen)]
[HID]
|
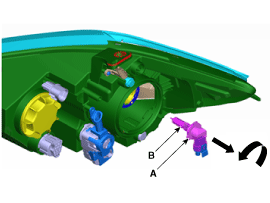

| 1. |
Turn the head lamp power off. |
| 2. |
Remove the bulb caps from the head lamp assembly after turning in the counter clock-wise direction.
|
| 3. |
Remove the head lamp high beam bulb (A) after disengaing the retaining clip (B) and disconnect the lamp connector.
|
 Head Lamps Description and Operation
HID Head Lamp
1.
Bulb
(1)
Elements
Xenon gas : Xenon gas activates the initial reaction for rapid illuminating.
Molybdenum electrode: anode arcing
Metal halide salts : color composing compone ...
 Room Lamp Repair procedures
Removal
[Room Lamp]
1.
Disconnect the negative (-) battery terminal.
2.
Using a screwdriver or remover, Separate the room lamp lens (A) from the room lamp.
•
Put o ...
Other information:
Hyundai Elantra AD (2016-2020) Owners Manual: Manual Transmission
Manual Transmission Operation
The manual transmission has 6 forward gears. The transmission is fully synchronized
in all forward gears so shifting to either a higher or a lower gear is easily accomplished.
WARNING
Before leaving the driver's seat, always make sure the shift lever is in 1st ...
Hyundai Elantra AD (2016-2020) Owners Manual: Why Didn't My Air Bag Go Off in a Collision?
There are certain types of accidents in which the air bag would not be expected
to provide additional protection. These include rear impacts, second or third collisions
in multiple impact accidents, as well as low speed impacts. Damage to the vehicle
indicates a collision energy absorption, an ...
