Hyundai Elantra: Interior Trim / Door Scuff Trim Repair procedures
| Replacement |
| [Front door scuff trim] |
|
|
| 1. |
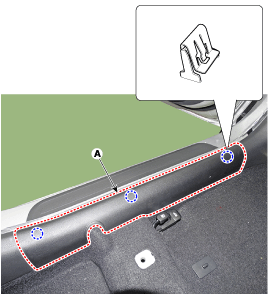
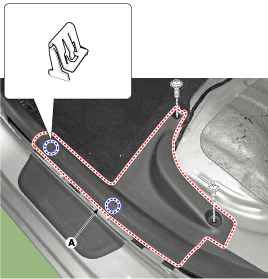
Using a screwdriver or remover, remove the front door scuff trim (A).
|
| 2. |
To intall, reverse the removal procedure.
|
| [Rear door scuff trim] |
|
|
| 1. |
Remove the rear seat cushion assembly.
(Refer to Rear Seat - "Rear Seat Assembly") |
| 2. |
Loosen the mounting screws and remove the rear door scuff trim (A).
|
| 3. |
To intall, reverse the removal procedure.
|
 Door Scuff Trim Components and Components Location
Component Location
1. Front door scuff trim2. Rear door scuff trim
...
 Door Step Trim Components and Components Location
Component
1. Front door step trim 2. Rear door step trim
...
Other information:
Hyundai Elantra AD (2016-2020) Service Manual: General Information
Specifications
Specification
Air Conditioner
ItemSpecificationCompressorType6VSe14Oil type & CapacityFD46XG (IDEMITSU) 110 ± 10 g (3.88 ± 0.35 oz.)Pulley type6PK-TYPEDisplacement142 cc/revExpansion valveTypeBlock typeRefrigerantTypeR-134aCapacity500 ± 25 g (17.6 ± 0.88 oz.)
Blower Un ...
Hyundai Elantra AD (2016-2020) Owners Manual: Electric chromic mirror (ECM) with HomeLinkÂź system and Blue LinkÂź
Your vehicle may be equipped with a Gentex Automatic-Dimming Mirror and an Integrated
HomeLinkÂź Wireless Control System. During nighttime driving, this feature will automatically
detect and reduce rearview mirror glare. The HomeLinkÂź Universal Transceiver allows
you to activate your garage d ...


