Hyundai Elantra: Automatic Transaxle Control System / 35R Clutch Control Solenoid Valve(35R/C_VFS) Repair procedures
Hyundai Elantra AD (2016-2020) Service Manual / Automatic Transaxle System / Automatic Transaxle Control System / 35R Clutch Control Solenoid Valve(35R/C_VFS) Repair procedures
| Inspection |
| 1. |
Turn ignition switch OFF. |
| 2. |
Remove the battery and battery tray.
(Refer to Engine Electrical System - "Battery") |
| 3. |
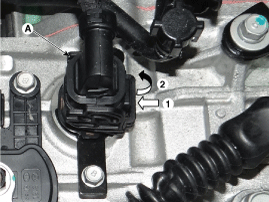
Disconnect the solenoid valve connector (A).
|
| 4. |
Measure resistance between sensor signal terminal and sensor ground terminal. |
| 5. |
Check that the resistance is within the specification. |
| Replacement |
If necessary replace the valve body or solenoid valves,
hydraulic adjustment is needed, replace the automatic transaxle
assembly.
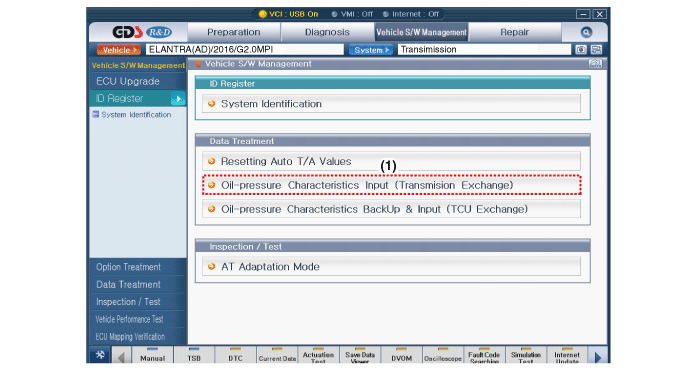
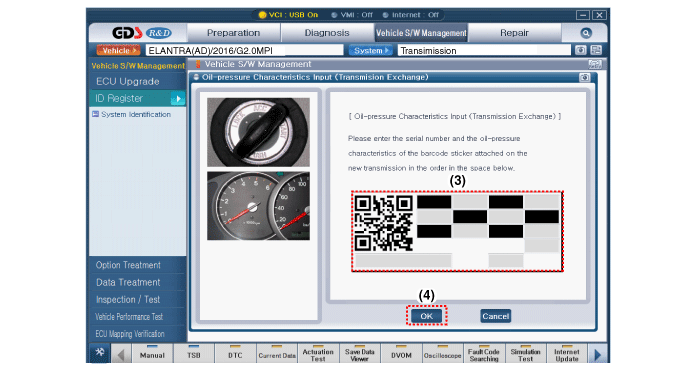
After the automatic transaxle assembly exchange, input the hydraulic calibration information of TCM. |

| 1. |
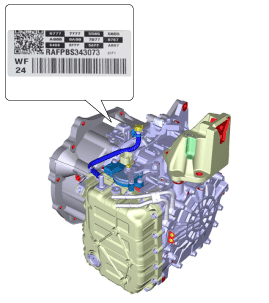
Perform the oil pressure characteristics input procedure.
• Oil pressure characteristics(bar code) location
• Oil-pressure characteristics input
(Transmision exchange)
|

 35R Clutch Control Solenoid Valve(35R/C_VFS) Schematic Diagrams
Circuit Diagram
...
 Underdrive Brake Control Solenoid Valve(UD/B_VFS) Description and Operation
Description
•
Underdrive brake control solenoid valve(UD/B) is attached to the valve body.
•
This variable force solenoid valve directly controls the hydraulic pressure inside the und ...
Other information:
Hyundai Elantra AD (2016-2020) Service Manual: Purge Control Solenoid Valve (PCSV) Description and Operation
Description
Purge Control Solenoid Valve (PCSV) is installed on the
intake manifold and controls the evaporative purge between the canister
and the intake manifold. It is a normally closed solenoid valve and is
open when the ECM grounds the valve control line. When the passage is
open (PC ...
Hyundai Elantra AD (2016-2020) Service Manual: ABS Control Module Components and Components Location
Components
1. Front - right tube2. Rear - left tube3. Rear - right tube4. Front - left tube5. MC SEC 6. MC PRI7. ABS control module(HECU)8. Bracket
...
© 2018-2026 www.helantraad.com
