Hyundai Elantra: Windshield Wiper/Washer / Rain Sensor Repair procedures
| • |
The dust or foreign substance on the rain sensor have a bad
effect upon the rain sensor capability,so protect the sensor surface
with protection cover until installing the rain sensor to bracket for
accurate funtion. |
| • |
The coupling pad on the rain sensor surface has adherive
strength, so the coupling pad could stick to the windshield by
environment condition during the using time. |
| • |
If separate it by force, it could be damaged. So make sure to separate the rain sensor from the windshield carefully. |
|
| 1. |
Reomve the rain sensor cover (A). 
|
| 2. |
Disconnect the wiring harness connector (A). 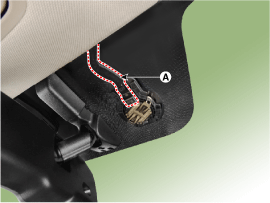
|
| 3. |
Be careful not to damage the cover latch by applying
excessive force. To remove the latch, pull aside the latch using the
cover hole with a small flat - blade screwdriver (A). 

|
| 4. |
Rain sensor module is attached to the front windshield by
glue replacing the front windshield, remove the rain sensor module from
the existing front windshield and install on the new front windshield. |
| • |
In case of the windshield with reflection layer which
reflects the infrared rays in sensing field, should install the rain
sensor into the field removed the reflection layer. |
| • |
Install the rain sensor after some time and be care not to be settled the dust after installation. |
|
| 1. |
Install the rainsensor bracket to the windshield glass using the tape. 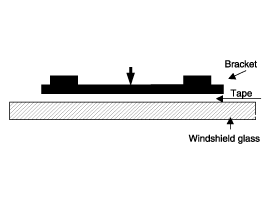
| • |
It is very important that the coupling pad pushes the windshield completely to stick to each other without bubbles. |
|
|
| 2. |
Connect the rainsensor connector, and then install the sensor cover. |
Description
Integrated Rain Sensor
Integrated rain sensor (A) controls three systems: front wiper, auto-light, and central air conditioner.
1.
Wiper Control System
When "AUTO" switch signal is ...
Components and Components Location
Components (1)
Components (2)
Description and Operation
Description
The ECM (Electro Chromatic inside rear view Mirror) is
intended dim the reflecting light ...


 Rain Sensor Description and Operation
 Electro Chromic Inside Rear View Mirror