
Hyundai Elantra: Windshield Wiper/Washer / Rain Sensor Description and Operation
Hyundai Elantra AD (2016-2020) Service Manual / Body Electrical System / Windshield Wiper/Washer / Rain Sensor Description and Operation
| Description |
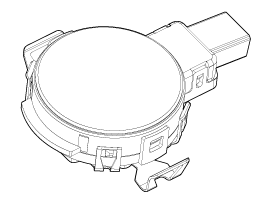
Integrated Rain Sensor
Integrated rain sensor (A) controls three systems: front wiper, auto-light, and central air conditioner.
| 1. |
Wiper Control System
When "AUTO" switch signal is received from the multi-function
switch on the right, the integrated rain sensor detects the amount of
rainfall. The sensor is installed inside the upper part of the front
window for wiper motor control.
This system automatically controls the operation duration and
speed of the wiper depending on the measured amount of rainfall even if
the driver does not operate the wiper switch.
|
| Functions and Operating Principles |
Basic Principle
| 1. |
Detecting the amount of rainfall
The light (beam) emitted from light emitting diodes (LED) is
totally reflected on the external surface of the windshield and comes
back to the photo diodes. When there is water on the external surface of
the windshield, the light is optically separated and reflected
partially and the remaining brightness is measured by the photo diodes.
Water remaining on the windshield results in the light being not totally
reflected. The loss of brightness due to this indicates how much the
glass surface is wet. |
Interference
Rain sensor might malfunction due to the interferences listed below.
| 1. |
Dust on the measuring surface and other surfaces on the
light path (surface of light emitting diodes and photo diodes, fiber
optics, bracket, and glass surface of windshield joint area) weakens the
received light. |
| 2. |
Movement of windshield and bracket |
| 3. |
Movement of bracket due to vibration |
| 4. |
Damaged wiper blade |
|

Automatic Operation
| 1. |
Operational status of rain sensor
|
Safety Function
| 1. |
When there is ice or foreign matter in the detecting area,
integrated rain sensor cannot recognize the condition for operation
correctly. |
Detecting Special Conditions
| 1. |
Rain sensor
|
 Rain Sensor Schematic Diagrams
Circuit Diagram
...
 Rain Sensor Repair procedures
Removal
•
The dust or foreign substance on the rain sensor have a bad
effect upon the rain sensor capability,so protect the sensor surface
with protection cover until ...
Other information:
Hyundai Elantra AD (2016-2020) Service Manual: Schematic Diagrams
Schematic Diagrams
Terminal Function
Wire No.DesignationCurrentmaxmin13Ground for recirculation pump39 A10 A1Voltage supply for pump motor39 A10 A25Voltage supply for solenoid valves15 A2 A38Ground for solenoid valves andECU15 A2 A22Signal wheel speed sensor (FL)16.8 mA5.9 mA33Voltage supply f ...
Hyundai Elantra AD (2016-2020) Service Manual: Air Cleaner Repair procedures
Removal and Installation
Air Cleaner Assembly
1.
Remove the engine cover.
(Refer to Engine And Transaxle Assembly - “Engine Cover�)
2.
Disconnect the battery negative terminal.
3.
Remove the air duct (A).
4.
Disconnect the breather hose (A).
5.
Disconnect the intake hose ...
© 2018-2026 www.helantraad.com
