
Hyundai Elantra: ESC(Electronic Stability Control) System / Schematic Diagrams
Hyundai Elantra AD (2016-2020) Service Manual / Brake System / ESC(Electronic Stability Control) System / Schematic Diagrams
| Schematic Diagrams |
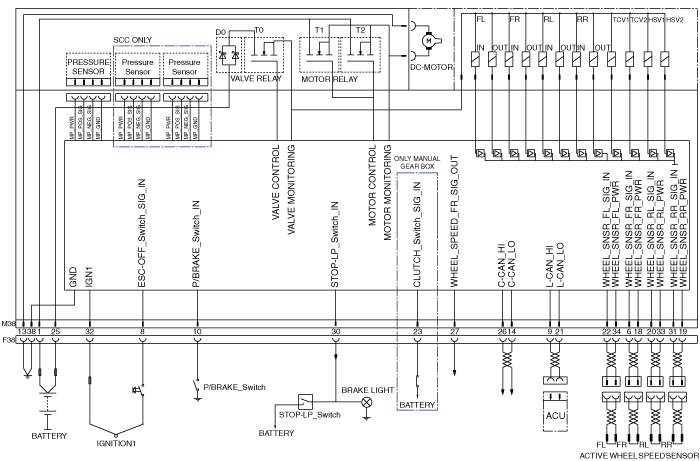
| Terminal Function |
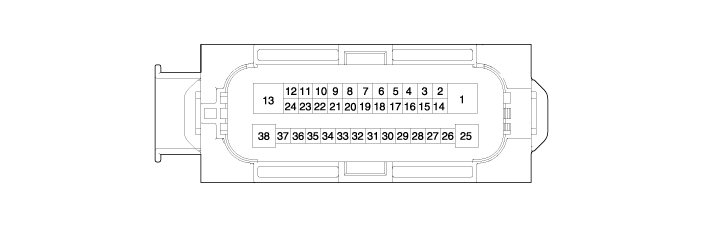
| Wire No. | Designation | Current | |
| max | min | ||
| 13 | Ground for recirculation pump | 39 A | 10 A |
| 1 | Voltage supply for pump motor | 39 A | 10 A |
| 25 | Voltage supply for solenoid valves | 15 A | 2 A |
| 38 | Ground for solenoid valves andECU | 15 A | 2 A |
| 22 | Signal wheel speed sensor (FL) | 16.8 mA | 5.9 mA |
| 33 | Voltage supply for the active wheel speed sensor(RL) | 16.8 mA | 5.9 mA |
| 19 | Voltage supply for the active wheel speed sensor(RR) | 16.8 mA | 5.9 mA |
| 18 | Voltage supply for the active wheel speed sensor(FR) | 16.8 mA | 5.9 mA |
| 6 | Signal wheel speed sensor (FR) | 16.8 mA | 5.9 mA |
| 14 | C-CAN LOW | 30 mA | 20 mA |
| 34 | Voltage supply for the active wheel speed sensor(FL) | 16.8 mA | 5.9 mA |
| 20 | Signal wheel speed sensor (RL) | 16.8 mA | 5.9 mA |
| 32 | Voltage for HECU (IGN) | 1 A | 500 mA |
| 31 | Signal wheel speed sensor (RR) | 16.8 mA | 5.9 mA |
| 30 | Brake light switch | 10 mA | 5 mA |
| 26 | C-CAN HIGH | 30 mA | 20 mA |
| 27 | Wheel speed sensor output | Open Draim | - |
| 8 | ESC switch | 10 mA | 5 mA |
| 23 | Clutch switch (MT Only) | 10 mA | 5 mA |
| 10 | Parking Brake switch | 10 mA | 5 mA |
| 21 | L-CAN LOW | 30 mA | 20 mA |
| 9 | L-CAN HIGH | 30 mA | 20 mA |
 Description and Operation
Description of ESC
Optimum driving safety now has a name : ESC, the Electronic Stability Program.
ESC recognizes critical driving conditions, such as panic
reactions in dangerous situations, a ...
 Repair procedures
Inspection
ESC System Bleeding
This procedure should be followed to ensure adequate bleeding
of air and filling of the ESC unit, brake lines and master cylinder
with brake fluid.
1.
Remove t ...
Other information:
Hyundai Elantra AD (2016-2020) Service Manual: Troubleshooting
Troubleshooting
SymptomPassible CauseRemedy (Refer to page)Water leaks from panorama sunroofDeteriorated roof lid weatherstripReplaceExcessive roof lid-to-body clearance and improperly fitted weatherstripAdjustWind noise around sunroof Loose or deformed deflector, gaps in body workRetighte ...
Hyundai Elantra AD (2016-2020) Service Manual: Components and Components Location
Components
1. ABS Control Module(HECU)2. Front Wheel Speed Sensor3. Rear Wheel Speed Sensor4. ABS Warning lamp5. EBD / Parking brake warning lamp
...
В© 2018-2026 www.helantraad.com
