Hyundai Elantra: Lubrication System / Oil Pressure Switch Repair procedures
Hyundai Elantra AD (2016-2020) Service Manual / Engine Mechanical System / Lubrication System / Oil Pressure Switch Repair procedures
| Removal and Installation |
| 1. |
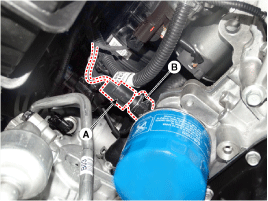
Disconnect the oil pressure switch connector (A) and then remove the oil pressure switch (B).
|
| 2. |
Install in the reverse order of removal. |
|
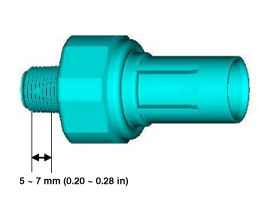
Seal lock : THREEBOND 2403
Thickness : 0.2 ~ 0.4 mm (0.008 ~ 0.016 in.) |

| Inspection |
| 1. |
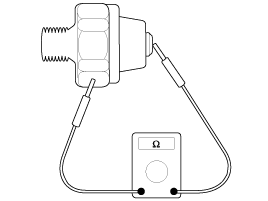
Check the continuity between the terminal and the body with an ohmmeter.
If there is no continuity, replace the oil pressure switch.
|
| 2. |
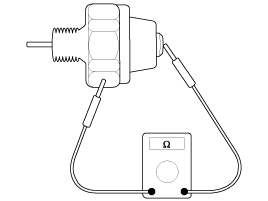
Check the continuity between the terminal and the body when
the fine wire is pushed. If there is continuity even when the fine wire
is pushed, replace the switch. |
| 3. |
If there is no continuity when a 50 kPa (0.50 kgf/cm?, 7.25
psi) is applied through the oil hole, the switch is operaing properly.
Check for air leakage. If air leaks, the diaphragm is broken. Replace it.
|
 Oil Pump Repair procedures
Removal and Installation
1.
Remove the timing chain cover.
(Refer to Timing System – “Timing Chain Cover”)
2.
Remove the oil pump cover (A).
Tightening torque
Screws :
5.9 ~ 8.8 N. ...
 Oil Level Gauge & Pipe Repair procedures
Removal and Installation
1.
Remove the oil level gauge (A).
2.
Install in the reverse order of removal. ...
Other information:
Hyundai Elantra AD (2016-2020) Owners Manual: Auto Door Lock/ Unlock Features
Impact sensing door unlock
All doors will be automatically unlocked when an impact causes the air bags to
deploy.
Speed sensing door lock
All doors will be automatically locked when vehicle speed exceeds 9 mph (15 km/h).
All of the doors will be automatically unlocked after the engine is turne ...
Hyundai Elantra AD (2016-2020) Service Manual: Cylinder Head Cover Repair procedures
Removal
•
Use fender covers to avoid damaging painted surfaces.
•
To avoid damage, unplug the wiring connectors carefully while holding the connector portion.
•
Mark all wiring and hoses to avoid misconnection.
1.
Remov ...
© 2018-2026 www.helantraad.com


