Hyundai Elantra: Lubrication System / Oil Pump Repair procedures
Hyundai Elantra AD (2016-2020) Service Manual / Engine Mechanical System / Lubrication System / Oil Pump Repair procedures
| Removal and Installation |
| 1. |
Remove the timing chain cover.
(Refer to Timing System ŌĆō ŌĆ£Timing Chain CoverŌĆØ) |
| 2. |
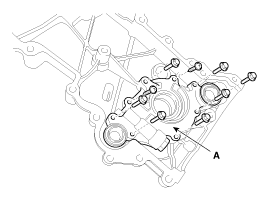
Remove the oil pump cover (A).
|
| 3. |
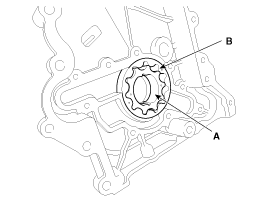
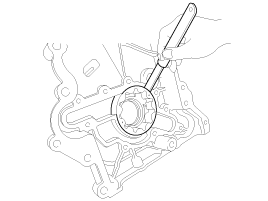
Remove the inner rotor (A) and outer rotor (B).
|
| 4. |
Install in the reverse order of removal. |
| Inspection |
| 1. |
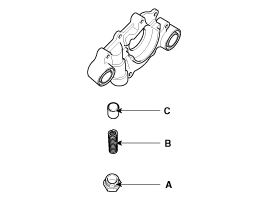
Remove the relief plunger.
Remove the plug (A), spring (B) and relief plunger (C).
|
| 2. |
Inspect the relief plunger.
Coat the plunger with engine oil and check that it falls smoothly into the plunger hole by its own weight.
If necessary, replace timing chain cover. |
| 3. |
Inspect the relief valve spring.
Inspect for distortion or breakdown of the relief valve spring. |
| 4. |
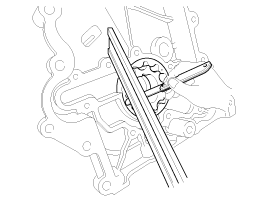
Inspect the rotor side clearance.
Using a feeler gauge and precision straight edge, measure the clearance between the inner rotors and precision straight edge.
If the side clearance is greater than maximum, replace the rotors as a set.
If necessary, replace the timing chain cover.
|
| 5. |
Inspect the rotor body clearance.
Using a feeler gauge, measure the clearance between the outer rotor and body.
If the body clearance is greater than maximum, replace the rotors as a set.
If necessary, replace the timing chain cover.
|
| 6. |
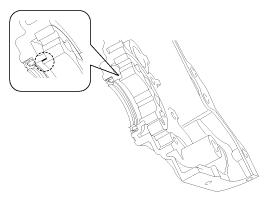
Inspect the rotor guide clearance.
|
 Oil Pump Components and Components Location
Components
1. Timing chain cover2. Outer roter3. Inner roter4. Oil pump cover5. Relief plunger6. Relief spring7. Relief plug8. O-ring (suction side)9. O-ring (discharge side)
...
 Oil Pressure Switch Repair procedures
Removal and Installation
1.
Disconnect the oil pressure switch connector (A) and then remove the oil pressure switch (B).
Tightening torque :
9.8 ~ 11.8N.m (1.0 ~ 1.2kgf.m, 7.2 ~ 8.7lb-ft)
...
Other information:
Hyundai Elantra AD (2016-2020) Service Manual: Overdrive Clutch Control Solenoid Valve(OD/C_VFS) Description and Operation
Description
ŌĆó
Overdrive clutch control solenoid valve(OD/C_VFS) is attached to the valve body.
ŌĆó
This variable force solenoid valve directly controls the hydraulic pressure inside the overdrive clutch. ...
Hyundai Elantra AD (2016-2020) Service Manual: Air Cleaner Repair procedures
Removal and Installation
Air Cleaner Assembly
1.
Remove the engine cover.
(Refer to Engine And Transaxle Assembly - ŌĆ£Engine CoverŌĆØ)
2.
Disconnect the battery negative terminal.
3.
Remove the air duct (A).
4.
Disconnect the breather hose (A).
5.
Disconnect the intake hose ...
┬® 2018-2026 www.helantraad.com

