Hyundai Elantra: Interior Trim / Front Pillar Trim Repair procedures

Replacement
   
Put on gloves to prevent hand injuries.
   
When removing with a flat-tip screwdriver or remover, wrap protective tape around the tools to prevent damage to components.
When removing the interior trim pieces, use a plastic panel removal tool not to damage the surface.
Take care not to bend or scratch the trim and panels.
1.
Remove the front pillar trim.
(1)
To remove the front pillar trim, the fastener remover (A) below must be used.

(2)
After slightly lifting up the front pillar trim and putting the tool in, remove the mounting clip (A) by pulling it.
   
Be sure to replace the existing clips with new ones when removing or replacing the front pillar trim.

(3)
Remove the front pillar trim (A).

2.
To intall, reverse the removal procedure.
   
Replace any damaged clips (or pin-type retainers).
Be sure to replace the existing clips with new ones when removing or replacing the front pillar trim.
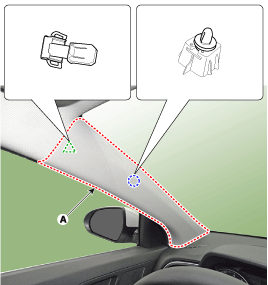
Front Pillar Trim Components and Components Location
Component Location 1. Front pillar trim ...

Center Pillar Trim Components and Components Location
Component Location 1. Center pillar lower trim2. Center pillar upper trim ...

Other information:

Hyundai Elantra AD (2016-2020) Service Manual: Components and Components Location
Components 1. Camshaft bearing cap2. Camshaft front bearing cap3. Exhaust camshaft4. Intake camshaft5. Exhaust CVVT assembly6. Intake CVVT assembly7. Cam carrier8. Cylinder head9. Cylinder head gasket10. Retainer lock11. Retainer 12. Valve spring13. Valve stem seal14. Valve 15. Swing arm16. Hyd ...

Hyundai Elantra AD (2016-2020) Service Manual: Rear Center Seat Belt Retractor Repair procedures
Replacement     • When installing the belt, make sure not to damage the retractor. 1. Remove the package tray trim. (Refer to Interior Trim - "Rear Package Tray Trim") 2. After loosening the mounting bolts, remove the rear center seat belt retractor (A). Tight ...

© 2018-2023 www.helantraad.com