Hyundai Elantra: Intake And Exhaust System / Intake Manifold Repair procedures
Hyundai Elantra AD (2016-2020) Service Manual / Engine Mechanical System / Intake And Exhaust System / Intake Manifold Repair procedures
| Removal and Installation |
| 1. |
Remove the engine cover.
(Refer to Engine And Transaxle Assembly - “Engine Cover”) |
| 2. |
Disconnect the battery negative terminal. |
| 3. |
Remove the air duct and air cleaner assembly.
(Refer to Intake And Exhasut System - "Air Cleaner") |
| 4. |
Remove the engine room under cover.
(Refer to Engine And Transaxle Assembly - "Engine Room Under Cover") |
| 5. |
Disconnect the wiring connectors and harness clamps and remove the wiring protector around the intake manifold.
|
| 6. |
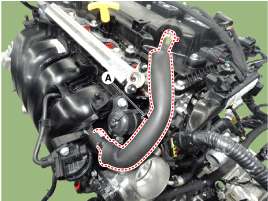
Disconnect the positive crankcase ventilation (PCV) hose (A).
|
| 7. |
Unfasten the electric throttle body control (ETC) module bolts.
(Refer to Engine Control/Fuel System - "ETC (Electric throttle body control) System") |
| 8. |
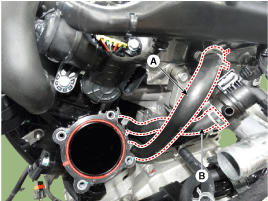
Disconnect the vacuum hose (A) and purge control solenoid valve (PCSV) hose (B).
|
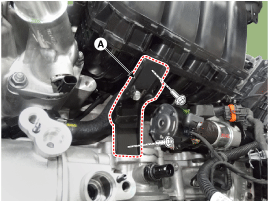
| 9. |
Remove the intake manifold stay (A).
|
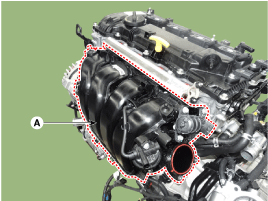
| 10. |
Remove the intake manifold (A) with the gasket.
|

| 11. |
Install in the reverse order of removal. |
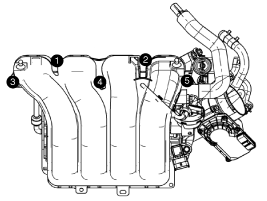
 Intake Manifold Components and Components Location
Components
1. Intake manifold assembly 2. Intake manifold gasket3. Electronic throttle body4. Intake manifold stay5. Variable intake solenoid (VIS) actuator6. VCM motor
...
 Variable Intake Solenoid(VIS) Actuator Repair procedures
Removal and Installation
1.
Disconnect the vacuum hose (A).
2.
Remove the variable Intake solenoid (VIS) actuator connector (B) and actuator (C).
Tightening torque :
9.8 ~ 11.8N.m (1.0 ~ ...
Other information:
Hyundai Elantra AD (2016-2020) Service Manual: Water Temperature Control Assembly Repair procedures
Removal and Installation
1.
Remove the engine cover.
(Refer to Engine And Transaxle Assembly - “Engine Cover”)
2.
Drain the engine coolant so its level is below water temperature control assembly.
(Refer to Cooling System - "Coolant")
3.
Remove the air duct and air cleaner assembly ...
Hyundai Elantra AD (2016-2020) Service Manual: Occupant Classification System (OCS) Components and Components Location
Components
1. Occupant Classification System (OCS) Unit2. Occupant Classification System (OCS) Sensor
Occupant Classification System (OCS) Unit ...
© 2018-2026 www.helantraad.com
