Hyundai Elantra: Automatic Transaxle Control System / Inhibitor Switch Repair procedures
| Inspection |
| Inspection flow of the inhibitor switch |
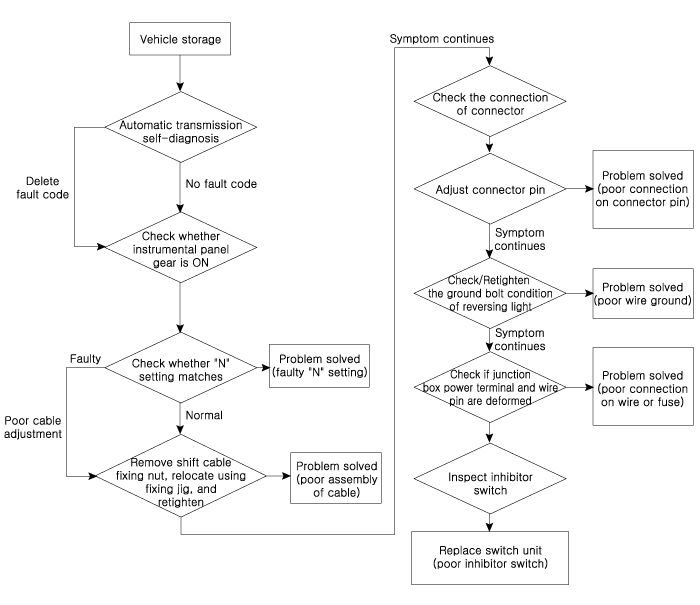
| 1. |
Inspect DTC code. |
| 2. |
Inspect whether N setting matches.
|
| 3. |
Inspect shift cable separation.
|
| 4. |
Inspect whether connector is connected.
|
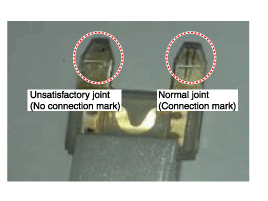
| 5. |
Inspect ground condition on reversing light circuit.
|
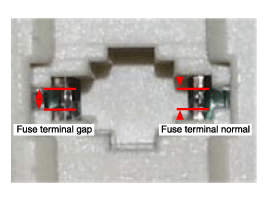
| 6. |
Inspect wiring connection on junction box power terminal and fuse lamp.
|
| 7. |
Inspect inhibitor switch signal.
|
| Removal |
| 1. |
Make sure vehicle does not roll before setting shift lever to "N" position. |
| 2. |
Disconnect the negative (-) battery cable. |
| 3. |
Remove the air cleaner assembly and air duct.
(Refer to Engine Mechanical System - "Air cleaner") |
| 4. |
Remove the battery and battery tray.
(Refer to Engine Electrical System - "Battery") |
| 5. |
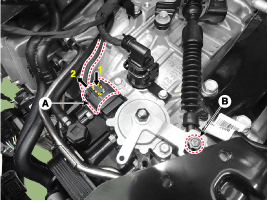
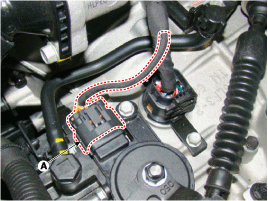
Disconnect the inhibitor switch connector (A). |
| 6. |
Remove the shift cable mounting nut (B).
|
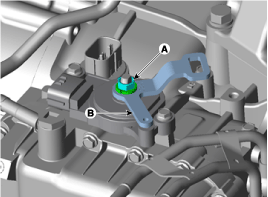
| 7. |
Remove the manual control lever (B) and the washer after removing a nut (A).
|
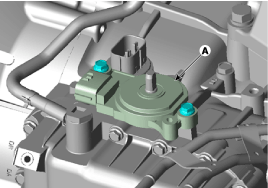
| 8. |
Remove the inhibitor switch(A) after removing the bolts (2ea).
|
| Installation |
| 1. |
Check that the shift lever is placed in the "N" position. |
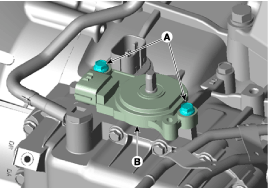
| 2. |
Lightly tighten the bolts(A) after installing the inhibitor switch(B).
|
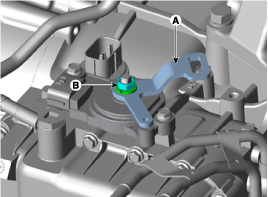
| 3. |
Lightly tighten the nut(A) after installing the manual control lever(B).
|
| 4. |
Align the hole (A) in the manual control lever with the "N"
position hole (B) of the inhibitor switch and then insert the inhibitor
switch guide pin (SST No.:09480-A3800).
|
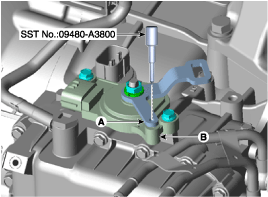
| 5. |
Tighten the nut (A) and bolts (B) with the specified torque.
|
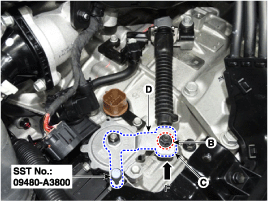
| 6. |
Lightly tighten the nut(B) after connected the shift cable(C) in the manual control lever(D). |
| 7. |
Push shift cable(C) lightly to "F" direction shown to eliminate free play of shift cable. |
| 8. |
Tighten the nut(B) with the specified torque.
|
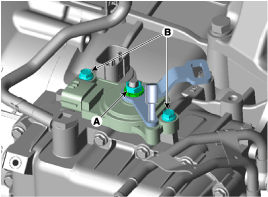
| 9. |
Remove the inhibitor switch guide pin (SST No.:09480-A3800) from the hole. |
| 10. |
Connect the inhibitor switch connector(A).
|
| 11. |
Install the battery and battery tray.
(Refer to Engine Electrical System - "Battery") |
| 12. |
Install the air cleaner assembly and air duct.
(Refer to Engine Mechanical System - "Air cleaner") |
| 13. |
Connect the battery negative (-) cable. |
| 14. |
Check that operating surely at each range of the inhibitor switch corresponding to each position of shift lever. |
 Inhibitor Switch Troubleshooting
Fault Diagnosis
Fault Diagnosis for Symptom
Major Symptom Expected Cause Items to Check and Measures Shift lever inoperableFaulty shift cable tensionAdjust shift cable t ...
 Shift Lever Components and Components Location
Components Location
1. Shift lever knob & boots2. Shift lever assembly3. Shift cable4. Manual control lever5. Shift cable retainer6. Snap pin
...
Other information:
Hyundai Elantra AD (2016-2020) Service Manual: Intake Manifold Repair procedures
Removal and Installation
1.
Remove the engine cover.
(Refer to Engine And Transaxle Assembly - “Engine Cover”)
2.
Disconnect the battery negative terminal.
3.
Remove the air duct and air cleaner assembly.
(Refer to Intake And Exhasut System - "Air Cleaner")
4.
Remove the engi ...
Hyundai Elantra AD (2016-2020) Owners Manual: Warning and Indicator lights. Parking Brake & Brake Fluid Warning Light
Information
Make sure that all warning lights are OFF after starting the engine. If any
light is still ON, this indicates a situation that needs attention.
Supplemental Restraint System Warning Light
This warning light illuminates:
Once you set the ignition switch or the Engine Start/Stop ...
