Hyundai Elantra: Controller / Heater & A/C Control Unit (Manual) Components and Components Location
Hyundai Elantra AD (2016-2020) Service Manual / Heating, Ventilation and Air Conditioning / Controller / Heater & A/C Control Unit (Manual) Components and Components Location
| Components |
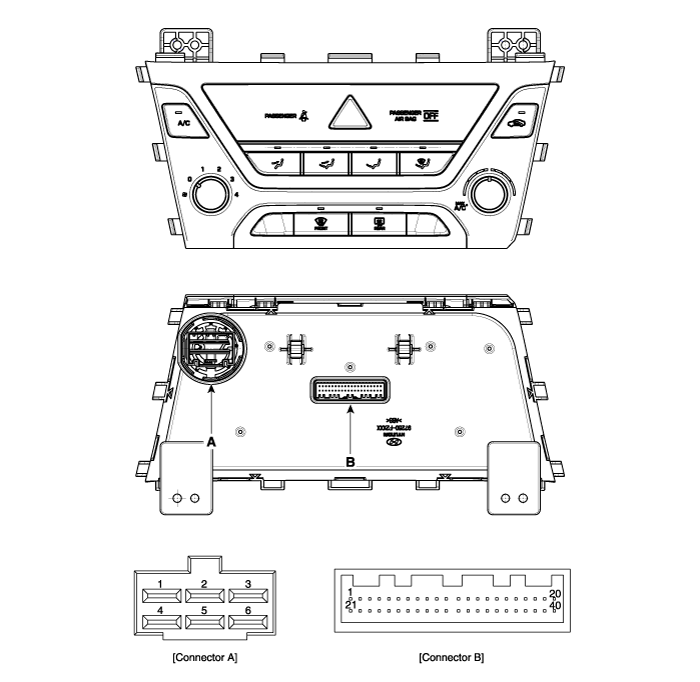
| Connector | Pin NO | Function | Connector | Pin NO | Function |
| A | 1 | Low | B | 18 | ILL- (RHEO) |
| 2 | Common | 19 | Sensor ground | ||
| 3 | Ground | 20 | Ground | ||
| 4 | Middle Low | 21 | Battery (+) | ||
| 5 | Middle High | 22 | ISG DC | ||
| 6 | High | 23 | ISG B+ | ||
| B | 1 | IGN2 | 24 | ILL+ (TAIL) | |
| 2 | PAB IGN1 | 25 | Sensor REF (+5V) | ||
| 3 | HTD (Rear defog indicator) | 26 | EVAP sensor (+) | ||
| 4 | Detent Out (-) | 27 | AMB sensor (+) | ||
| 5 | PTC Relay 2 | 28 | Mode control actuator (Feedback) | ||
| 6 | PTC Relay 3 | 29 | Temperature control actuator (Feedback) | ||
| 7 | PTC on signal | 30 | Intake actuator (Feedback) | ||
| 8 | PAB Off signal | 31 | Mode control actuator (Vent) | ||
| 9 | SBR | 32 | Mode control actuator (Def) | ||
| 10 | Rear SBR [LH] | 33 | Temperature control actuator (Cool) | ||
| 11 | Rear SBR [Center] | 34 | Temperature control actuator (Warm) | ||
| 12 | Rear SBR [RH] | 35 | Intake actuator (Fresh) | ||
| 13 | ECV+ | 36 | Intake actuator (Recirculation) | ||
| 14 | ECV- (Ground) | 37 | C_CAN High | ||
| 15 | Max blower on signal | 38 | C_CAN Low | ||
| 16 | Rear defogging swich (On) | 39 | Blower common signal | ||
| 17 | Hazard signal | 40 | Ground |
 Controller
...
 Heater & A/C Control Unit (Manual) Repair procedures
Replacement
1.
Disconnect the negative (-) battery terminal.
2.
Remove the glove box upper cover assembly.
(Refer to Body - "Glove Box Upper Cover Assembly")
3.
Loosen the mounting screw ...
Other information:
Hyundai Elantra AD (2016-2020) Service Manual: ESC OFF Switch Description and Operation
Description
1.
The ESC OFF switch is for the user to turn off the ESP system.
2.
The ESC OFF lamp is on when ESP OFF switch is engaged. ...
Hyundai Elantra AD (2016-2020) Owners Manual: Driver Assist System
Rear View Monitor
The Rear View Monitor will activate when the engine is running and the shift
lever is in the R (Reverse) position.
This is a supplemental system that provides a view of the area behind the vehicle
through the display audio or AVN screen while the vehicle is in the R (Reve ...
© 2018-2026 www.helantraad.com
