Hyundai Elantra: Front Suspension System / Front Lower Arm Repair procedures
Hyundai Elantra AD (2016-2020) Service Manual / Suspension System / Front Suspension System / Front Lower Arm Repair procedures
| Removal |
| 1. |
Loosen the wheel nuts slightly.
Raise the vehicle, and make sure it is securely supported. |
| 2. |
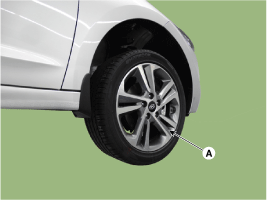
Remove the front wheel and tire (A) from front hub.
|

| 3. |
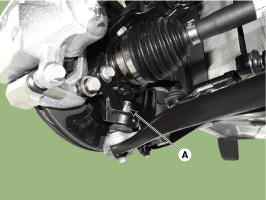
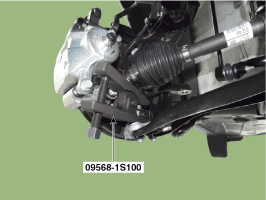
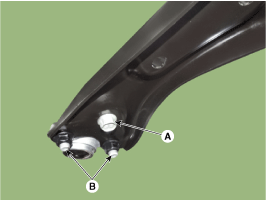
Loosen the lower arm nut(A) and then remove the lower arm ball joint by using SST(09568-1S100).
|
| 4. |
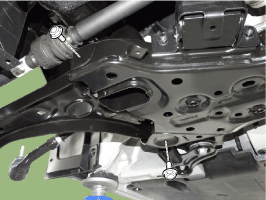
Remove the front lower (A) arm after loosening the bolts & nuts.
|
| 5. |
To install, reverse the removal procedure. |
| 6. |
Check the wheel Alignment.
(Refer to Tires/Wheels - "Alignment") |
| Replacement |
| Lower arm boall joint assemlby replcement |
| 1. |
Loosen the wheel nuts slightly.
Raise the vehicle, and make sure it is securely supported. |
| 2. |
Remove the front wheel and tire (A) from front hub.
|
| 3. |
Loosen the lower arm nut (A) and then remove the lower arm ball joint by using SST(09568-1S100).
|
| 4. |
Remove the ball joint after loosening the nut (B) & bolt (A).
|
| 5. |
Replace a ball joint assembly with a new one. |
| 6. |
Install the ball joint assembly and then tighten the nut (B) & bolt (A).
|
| 7. |
Install the lower arm and tire.
|

| Inspection |
| 1. |
Check the bushing for wear and deterioration. |
| 2. |
Check the lower arm for deformation. |
| 3. |
Check the all bolts and nuts. |
 Front Strut Assembly Repair procedures
Removal
1.
Loosen the wheel nuts slightly.
Raise the vehicle, and make sure it is securely supported.
2.
Remove the front wheel and tire (A) from front hub.
Tightening torque :
107.9 ~ 12 ...
 Front Stabilizer Bar Repair procedures
Removal
1.
Loosen the wheel nuts slightly.
Raise the vehicle, and make sure it is securely supported.
2.
Remove the front wheel and tire (A) from front hub.
Tightening torque :
107.9 ~ 12 ...
Other information:
Hyundai Elantra AD (2016-2020) Service Manual: Engine And Transaxle Assembly Repair procedures
Removal
ŌĆó
Use fender covers to avoid damaging painted surfaces.
ŌĆó
To avoid damage, unplug the wiring connectors carefully while holding the connector portion.
ŌĆó
Mark all wiring and hoses to avoid misconnection.
ŌĆó
For rel ...
Hyundai Elantra AD (2016-2020) Service Manual: Troubleshooting
Troubleshooting
SymptionSuspect areaRemedyEngine misfire with abnormal internal lower engine noises
ŌĆó
Worn crankshaft bearings
ŌĆó
Loose or out of specification engine flywheel
ŌĆó
Replace the crankshaft and bearings as required.
ŌĆó
Repair or replace the flywheel as req ...
┬® 2018-2026 www.helantraad.com
