Hyundai Elantra: AVN System / External AMP Components and Components Location
Hyundai Elantra AD (2016-2020) Service Manual / Body Electrical System / AVN System / External AMP Components and Components Location
| Components |
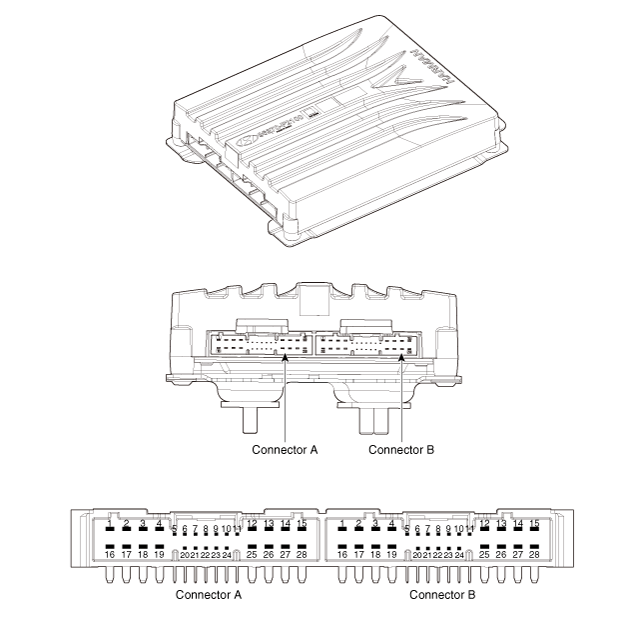
| No | Connector A | No | Connector B |
| 1 | BATT (+) | 1 | Subwoofer 2 (+) |
| 2 | BATT (+) | 2 | Subwoofer 1 (+) |
| 3 | BATT (+) | 3 | Front door tweeter speaker - RH (+) |
| 4 | BATT (+) | 4 | Front door tweeter speaker - LH (+) |
| 5 | - | 5 | - |
| 6 | Multimedia CAN (High) | 6 | - |
| 7 | Multimedia CAN (Low) | 7 | - |
| 8 | ACC | 8 | - |
| 9 | Navigation voice (+) | 9 | - |
| 10 | - | 10 | - |
| 11 | - | 11 | - |
| 12 | - | 12 | Rear door speaker - RH (+) |
| 13 | - | 13 | Rear door speaker - LH (+) |
| 14 | - | 14 | Center speaker (+) |
| 15 | - | 15 | - |
| 16 | Ground | 16 | Subwoofer 2 (-) |
| 17 | Ground | 17 | Subwoofer 1 (-) |
| 18 | Ground | 18 | Front door tweeter speaker - RH (-) |
| 19 | Ground | 19 | Front door tweeter speaker - LH (-) |
| 20 | SPDIF (High) | 20 | - |
| 21 | SPDIF (Low) | 21 | - |
| 22 | SPDIF GND | 22 | - |
| 23 | Navigation voice (-) | 23 | - |
| 24 | - | 24 | - |
| 25 | - | 25 | Rear door speaker - RH (-) |
| 26 | - | 26 | Rear door speaker - LH (-) |
| 27 | - | 27 | Center speaker (+) |
| 28 | - | 28 | - |
 AVN(Audio Video Navigation) head unit Repair procedures
Removal
•
Take care not to scratch the cluster fascia panel and related parts.
•
Eject all the disc before removing the AVN head unit to prevent damaging the DVD ...
 External AMP Repair procedures
Removal
1.
Disconnect the negative (-) battery terminal.
2.
Open the trunk, remove the right luggage side trim.
(Refer to Body - "Trunk Trim")
3.
Remove the external amplifier (B) after d ...
Other information:
Hyundai Elantra AD (2016-2020) Service Manual: Input Speed Sensor Repair procedures
Inspection
1.
Using the GDS, check the input/output speed sensor waveforms.
A.
Turn OFF the ignition switch.
B.
Connect the GDS to the Data Link Connector(DLC) on the lower crash pad.
C.
Ignition "ON" & Engine "ON".
D.
Check the input/output speed sensor waveforms at high spe ...
Hyundai Elantra AD (2016-2020) Service Manual: Roof Trim
Components and Components Location
Components (1)
[General Type]
1. Roof trim 2. Sunvisor [LH] 3. Sunvisor [RH] 4. Assist handle
Components (2)
[Sunroof Type]
1. Roof trim 2. Sunvisor [LH] 3. Sunvisor [RH] 4. Assist handle
Sunvisor Components and Components ...
© 2018-2026 www.helantraad.com
