Hyundai Elantra: Intake And Exhaust System / Exhaust Manifold Repair procedures
| Removal and Installation |
| 1. |
Remove the engine cover.
(Refer to Engine And Transaxle Assembly - “Engine Cover”) |
| 2. |
Disconnect the battery negative terminal. |
| 3. |
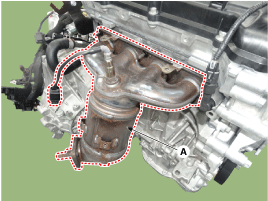
Disconnect the oxygen sensor connectors (A).
|
| 4. |
Remove the engine room under cover.
(Refer to Engine And Transaxle Assembly - “Engine Room Under Cover”) |
| 5. |
Remove the front muffler.
(Refer to Intake And Exhaust System - "Muffler") |
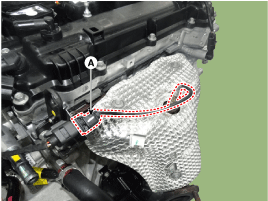
| 6. |
Remove the exhaust manifold heat protector (A).
|
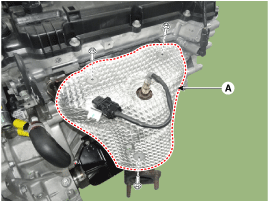
| 7. |
Remove the driveshaft heat protector (A).
|
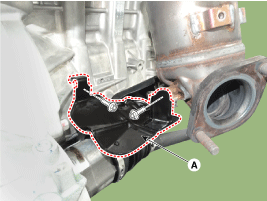
| 8. |
Remove the exhaust manifold stay (A).
|
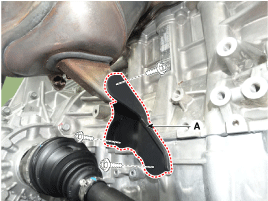
| 9. |
Remove the exhaust manifold (A) with the gasket.
|

| 10. |
Install in the reverse order of removal.
|
 Exhaust Manifold Components and Components Location
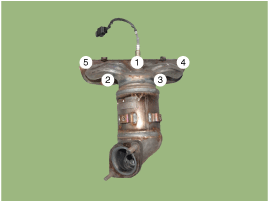
Components
1. Heat protector2. Exhaust manifold gasket3. Exhaust manifold4. Exhaust manifold stay
...
 Muffler Components and Components Location
Components
1. Front muffler2. Catalytic converter & center muffler assembly3. Main muffler4. Gasket5. Hanger
...
Other information:
Hyundai Elantra AD (2016-2020) Service Manual: Fuel Tank Pressure Sensor (FTPS) Description and Operation
Description
Fuel Tank Pressure Sensor (FTPS) is a component of the
evaporative emission control system and is installed on the fuel tank,
the fuel pump, or the canister. It checks the purge control solenoid
valve operation and detects a leakage of the system. ...
Hyundai Elantra AD (2016-2020) Service Manual: Components and Components Location
Component Location Index
Engine Room
1. Expansion valve2. Service port (Low pressure)3. Service port (High pressure)4. A/C Pressure transducer (APT)5. Compressor6. Discharge hose 7. Suction & Liquid tube assembly8. Condenser9. Ambient temperature sensor
[Interior]
1. Auto defogging s ...
