
Hyundai Elantra: Airbag Module / Curtain Airbag (CAB) Module Repair procedures
| Removal |
| 1. |
Disconnect the battery negative cable and wait for at least 3 minutes before beginning work. |
| 2. |
Remove the roof trim.
(Refer to Body - "Roof Trim Assembly") |
| 3. |
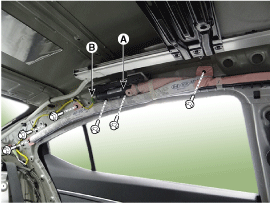
Remove the curtain airbag (A) after disconnecting the curtain airbag harness connector (B) and loosening the mounting bolts.
|
| Installation |
| 1. |
Remove the ignition key from the vehicle. |
| 2. |
Disconnect the battery negative cable and wait for at least three minutes. |
| 3. |
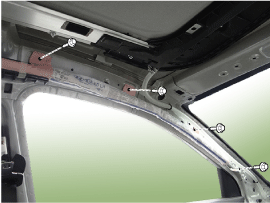
Tighten the curtain airbag mounting bolts and nuts.
|

| 4. |
Connect the curtain airbag connector. |
| 5. |
Install the roof trim.
(Refer to Body - "Roof Trim Assembly") |
| 6. |
Reconnect the battery negative cable. |
| 7. |
After installing the curtain airbag (CAB), confirm proper system operation:
|
 Curtain Airbag (CAB) Module Description and Operation
Description
Curtain airbags are installed inside the headliner (LH and
RH) and protect the driver and passenger from danger when side crash
occurs. The SRSCM determines deployment of curtain ai ...
 Knee Airbag (KAB) Module Components and Components Location
Components
1. Knee Airbag (KAB)
...
Other information:
Hyundai Elantra AD (2016-2020) Service Manual: Transaxle Control Module (TCM) Repair procedures
Inspection
Transaxle Control Module(TCM) Problem Inspection Procedure
1.
TEST TCM GROUND CIRCUIT: Measure resistance between TCM and
chassis ground using the backside of TCM harness connector as TCM side
check point. If the problem is found, repair it.
Specification: Below 1?
2.
TE ...
Hyundai Elantra AD (2016-2020) Owners Manual: Climate Control Air Filter
Filter Inspection
The climate control air filter should be replaced according to the Maintenance
Schedule. If the vehicle is operated in severely air-polluted cities or on dusty
rough roads for a long period, it should be inspected more frequently and replaced
earlier. When you replace the cl ...
