Hyundai Elantra: Air Conditioning System / Condenser Repair procedures
| Inspection |
| 1. |
Check the condenser fins for clogging and damage. If clogged,
clean them with water, and blow them with compressed air. If bent,
gently bend them using a screwdriver or pliers. |
| 2. |
Check the condenser connections for leakage, and repair or replace it, if required.
|
| Replacement |
| 1. |
Recover the refrigerant with a recovery / recycling / charging station. |
| 2. |
Disconnect the negative (-) battery terminal. |
| 3. |
Remove the front bumper.
(Refer to Body - "Front Bumper Cover") |
| 4. |
Remove the hood latch assembly.
(Refer to Body - "Front Wheel Guard") |
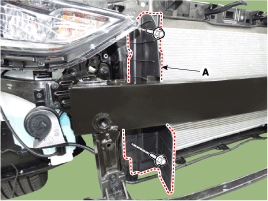
| 5. |
Loosen the mounting pin-type retainers and bolts, remove the side air guard (A).
[LH]
[RH]
|

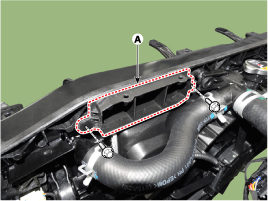
| 6. |
Loosen the mounting bolts and remove the air duct bracket (A).
|
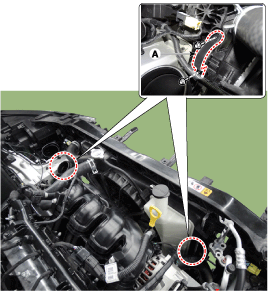
| 7. |
Loosen the mounting bolts and remove the radiator upper mounting bracket (A).
|
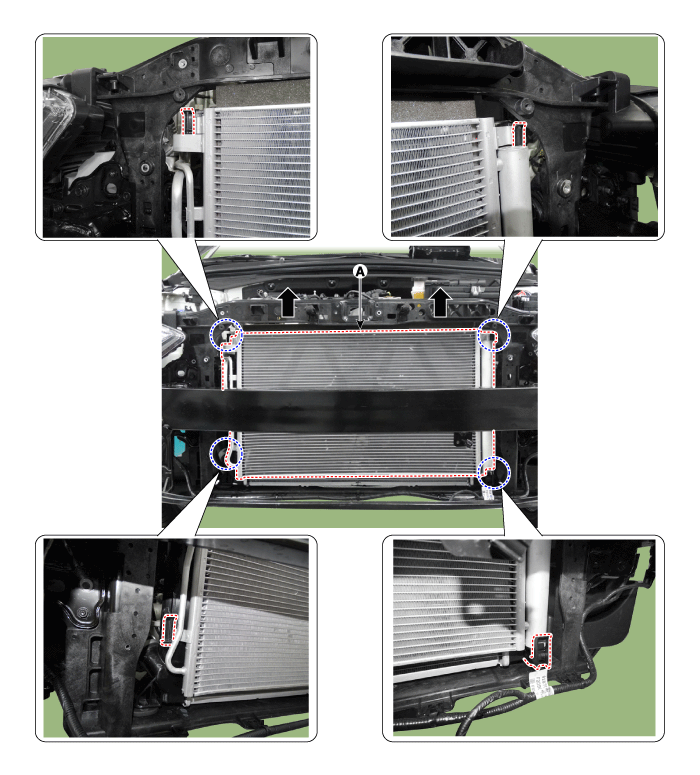
| 8. |
Remove the condenser (A) from radiator.
|
| 9. |
To intall, reverse the removal procedure.
|

 Condenser Components and Components Location
Components Location
1. Condenser
...
 Receiver-Drier Repair procedures
Replacement
1.
Remove the condenser.
2.
Remove the cap (A) on the bottom of the condenser with a L wrench.
Tightening torque :
9.81 ~ 14.71 N.m (1.0 ~ 1.5 kgf.m, 7.2 ~ 10.8 lb-ft)
...
Other information:
Hyundai Elantra AD (2016-2020) Service Manual: Head Lamps Repair procedures
Head Lamp Aiming Instructions
[Mechanical Aiming]
The head lamps should be aimed with the proper beam-setting
equipment, and in accordance with the equipment manufacturer's
instructions.
•
If there are any regulations pertinent to the aiming of head
lamps in the ...
Hyundai Elantra AD (2016-2020) Service Manual: Adaptive Front Lighting System Repair procedures
Removal
AFLS Unit
1.
Disconnect the negative (-) battery terminal.
2.
Remove the glove box housing.
(Refer to Body - "Glove Box Housing")
3.
Remove the AFLS unit (A) after removing connector and nuts (2EA).
Installation
AFLS Unit
1.
Install the AFLS unit after connecting the conn ...
