Hyundai Elantra: Brake System / Brake Pedal Repair procedures
Hyundai Elantra AD (2016-2020) Service Manual / Brake System / Brake System / Brake Pedal Repair procedures
| Removal |
| 1. |
Turn ignition switch OFF and disconnect the negative (-) battery cable. |
| 2. |
Remove the crash pad lower panel.
(Refer to Body - "Crash Pad") |
| 3. |
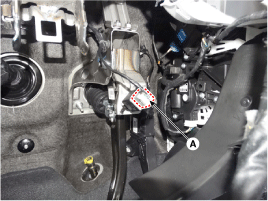
Disconnect the stop lamp switch connector (A).
|
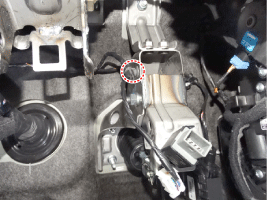
| 4. |
Remove the wiring fixed clip from the brake pedal member.
|
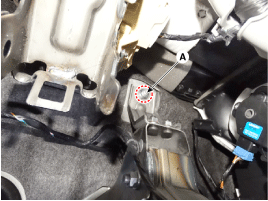
| 5. |
Remove the bracket mounting nut (A).
|
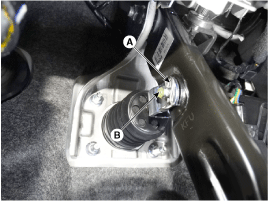
| 6. |
Remove the snap pin (A) and clevis pin (B).
|
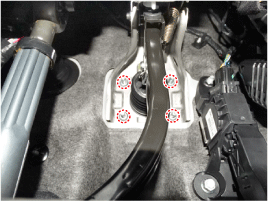
| 7. |
Remove the mounting nuts (A).
|
| 8. |
To install, reverse the removal procedure. |
| Inspection |
| 1. |
Check the brake pedal for bending or twisting. |
| 2. |
Check the brake pedal return spring for damage. |
| 3. |
Check the stop lamp switch. |
 Brake Pedal Components and Components Location
Components
1. Stop lamp switch2. Brake pedal member assembly3. Return spring4. Bolt5. Brake pedal arm assembly
...
 Front Disc Brake Components and Components Location
Components
1. Caliper body2. Bleed screw3. Pad return spring4. Brake pad5. Caliper carrier6. Pad inner shim7. Pad retainer
...
Other information:
Hyundai Elantra AD (2016-2020) Service Manual: Oil Pan Components and Components Location
Components
1. Oil screen gasket2. Oil screen3. Oil pan
...
Hyundai Elantra AD (2016-2020) Service Manual: Head Lamps Description and Operation
HID Head Lamp
1.
Bulb
(1)
Elements
Xenon gas : Xenon gas activates the initial reaction for rapid illuminating.
Molybdenum electrode: anode arcing
Metal halide salts : color composing component
(2)
Lightening principle
When Xenon gas and metal halide salt will discharge the molybdenum ...
© 2018-2026 www.helantraad.com
