Hyundai Elantra: Body (Interior and Exterior) / Body Side Molding
Delta Garnish Repair procedures
| • |
Put on gloves to prevent hand injuries. |
|
| • |
When removing with a flat-tip screwdriver or remover, wrap protective tape around the tools to prevent damage to components. |
| • |
Take care not to scratch the body surface. |
|
| 1. |
Using a screwdriver or remover, remove the delta garnish (A). 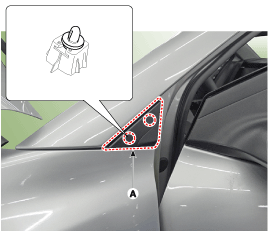
|
| 2. |
To intall, reverse the removal procedure.
| • |
Replace any damaged clips (or pin-type retainers). |
|
|
Front Wheel Guard Repair procedures
| • |
Put on gloves to prevent hand injuries. |
|
| • |
When removing with a flat-tip screwdriver or remover, wrap protective tape around the tools to prevent damage to components. |
| • |
Take care not to scratch the body surface. |
|
| 1. |
Remove the engine room cover.
(Refer to Engine Mechanical System - " Engine Room Cover") |
| 2. |
Remove the front tire. |
| 3. |
After loosening the mounting clips and remove the front wheel guard (A). 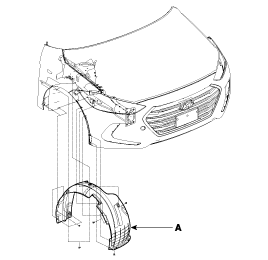
|
| 4. |
To intall, reverse the removal procedure.
| • |
Replace any damaged clips (or pin-type retainers). |
|
|
Rear Wheel Guard Repair procedures
| • |
Put on gloves to prevent hand injuries. |
|
| • |
When removing with a flat-tip screwdriver or remover, wrap protective tape around the tools to prevent damage to components. |
| • |
Take care not to scratch the body surface. |
|
| 2. |
After loosening the mounting screws, clips and nut, remove the rear wheel guard (A). 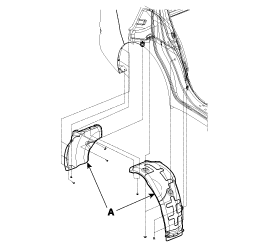
|
| 3. |
To intall, reverse the removal procedure.
| • |
Replace any damaged clips (or pin-type retainers). |
|
|
Front Mud Guard Repair procedures
| • |
Put on gloves to prevent hand injuries. |
|
| • |
When removing with a flat-tip screwdriver or remover, wrap protective tape around the tools to prevent damage to components. |
| • |
Take care not to scratch the body surface. |
|
| 1. |
After loosening the mounting screws and remove the front mud guard (A). 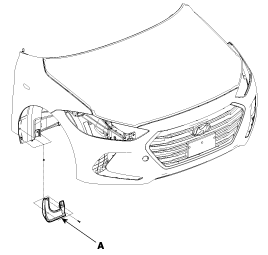
|
| 2. |
To intall, reverse the removal procedure.
| • |
Replace any damaged clips (or pin-type retainers). |
|
|
Rear Mud Guard Repair procedures
| • |
Put on gloves to prevent hand injuries. |
|
| • |
When removing with a flat-tip screwdriver or remover, wrap protective tape around the tools to prevent damage to components. |
| • |
Take care not to scratch the body surface. |
|
| 1. |
After loosening the mounting screws and remove the rear mud guard (A). 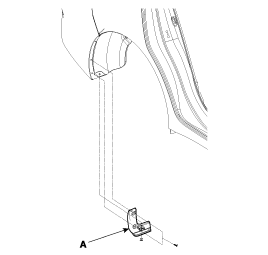
|
| 2. |
To intall, reverse the removal procedure.
| • |
Replace any damaged clips (or pin-type retainers). |
|
|
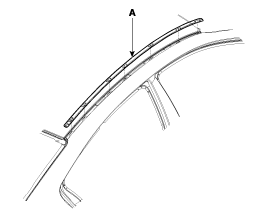
Roof Side Molding Repair procedures
| • |
Put on gloves to prevent hand injuries. |
|
| • |
When removing with a flat-tip screwdriver or remover, wrap protective tape around the tools to prevent damage to components. |
|
| 1. |
Using a screwdriver or remover, remove the roof side molding (A).
| • |
Always replace the roof side molding to a new one. |
|
|
| 2. |
To intall, reverse the removal procedure.
| • |
Replace any damaged clips (or pin-type retainers). |
|
|
Replacement
1.
Loosen the rear door checker (B) mounting bolt.
Tightening torque :
16.7 ~ 21.6 N.m (1.7 ~ 2.2 kgf.m,12.3 ~ 15.9 lb-ft)
2.
Detach the clips, remove the rear door side weat ...


 Rear Door Side Weatherstrip Repair procedures