Hyundai Elantra: Cooling System / Water pump Repair procedures
| Removal and Installation |
| 1. |
Drain the coolant.
(Refer to Cooling System - "Coolant") |
| 2. |
Remove the drive belt.
(Refer to Timing System - “Drive Belt”) |
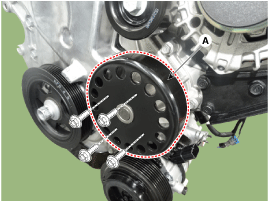
| 3. |
Remove the water pump pulley (A).
|
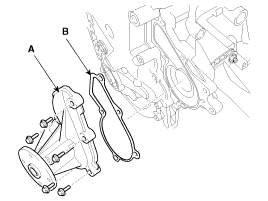
| 4. |
Remove the water pump assembly (A) with the gasket (B).
|
| 5. |
Install in the reverse order of removal.
|

| 6. |
Fill the engine coolant.
(Refer to Cooling System - "Coolant") |
| 7. |
Start the engine and check for leaks. |
| 8. |
Recheck the coolant level. |
| Inspection |
| 1. |
Check each part for cracks, damage or wear, and replace the coolant pump assembly if necessary. |
| 2. |
Check the bearing for damage, abnormal noise and sluggish rotation, and replace the coolant pump assembly if necessary. |
| 3. |
Check for coolant leakage. If coolant leaks from hole, the seal is defective. Replace the coolant pump assembly.
|
 Water pump Components and Components Location
Components
1. Water pump pulley2. Water pump3. Water pump gasket
...
 Water pump Troubleshooting
Troubleshooting
SymptomsPossible CausesRemedyCoolant leakage
•
From the bleed hole of the water pump
Visually check
•
Check leaks after about ten-minute warming up.
•
If cool ...
Other information:
Hyundai Elantra AD (2016-2020) Owners Manual: Installing a Child Restraint System (CRS)
WARNING
Before installing your child restraint system always:
Read and follow the instructions provided by the manufacturer of the
child restraint.
Read and follow the instructions regarding child restraint systems in
this manual.
Failure to follow all warnings and instructions could ...
Hyundai Elantra AD (2016-2020) Owners Manual: Sunvisor
To use a sunvisor, pull it downward. To use a sunvisor for a side window, pull
it downward, unsnap it from the bracket (1) and swing it to the side (2).
To use the vanity mirror, pull down the sunvisor and slide the mirror cover (3).
Adjust the sunvisor forward or backward (4) as needed. Use t ...
