Hyundai Elantra: Air Conditioning System / A/C Pressure Transducer Repair procedures
Hyundai Elantra AD (2016-2020) Service Manual / Heating, Ventilation and Air Conditioning / Air Conditioning System / A/C Pressure Transducer Repair procedures
| Inspection |
| 1. |
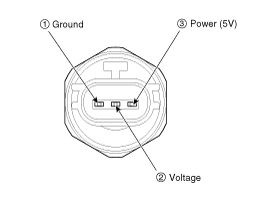
Measure the pressure of high pressure line by measuring voltage output between terminal “1” and “2”.
|
| 2. |
Inspect the voltage value whether it is sufficient to be regular value or not.
|
| 3. |
If the measured voltage value is not wihtin specification, replace the A/C pressure transducer. |
| Diagnosis With GDS |
| 1. |
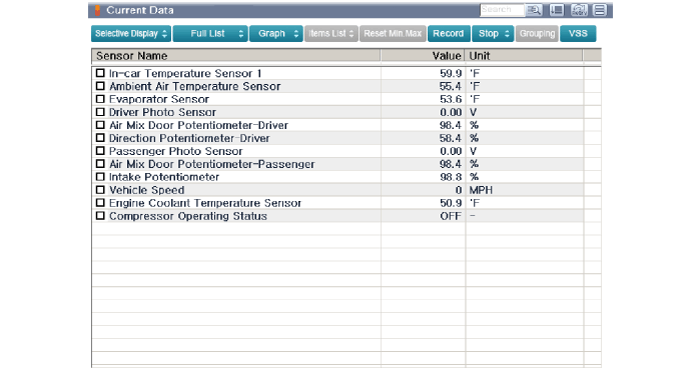
The heating, ventilation and air conditioning can be quickly diagnosed failed parts with vehicle diagnostic system (GDS).
? The diagnostic system (GDS) provides the following information.
(1) Self diagnosis : Checking the failure code (DTC) and display.
(2) Current data : Checking the system input/output data state.
(3) Actuation test : Checking the system operation condition.
(4) Additional function : Other controlling such as he system option and zero point adjustment. |
| 2. |
Select the 'Car model' and the system to be checked in order to check the vehicle with the tester. |
| 3. |
Select the 'Current data' menu to search the current state of the input / output data.
The input/output data for the sensors corresponding to the A/C Pressure Transducer can be checked.
|
| Replacement |
| 1. |
Disconnect the negative (-) battery terminal. |
| 2. |
Recover the refrigerant with a recovery/charging station. |
| 3. |
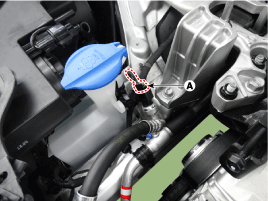
Disconnect the A/C pressure transducer connector (A).
|
| 4. |
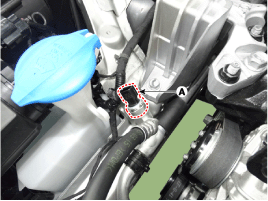
Remove the A/C pressure transducer (A).
|

| 5. |
To intall, reverse the removal procedure.
|

 A/C Pressure Transducer Description and Operation
Description
The A/C Pressure Transducer (APT) converts the pressure value
of high pressure line into voltage value after measuring it. By
converted voltage value, engine ECU controls the coolin ...
 Evaporator Temperature Sensor Description and Operation
Description
The evaporator temperature sensor will detect the evaporator
core temperature and interrupt compressor relay power in order to
prevent evaporator from freezing by excessive cooling. ...
Other information:
Hyundai Elantra AD (2016-2020) Service Manual: Line Pressure Control Solenoid Valve Description and Operation
Description
•
Line pressure control solenoid valve is attached to the valve body.
•
This variable force solenoid valve indirectly controls the hydraulic pressure inside the line pressure. ...
Hyundai Elantra AD (2016-2020) Service Manual: Glove Box Upper Cover Housing Repair procedures
Replacement
•
Put on gloves to prevent hand injuries.
•
When removing with a flat-tip screwdriver or remover, wrap protective tape around the tools to prevent damage to components.
•
Use a plastic panel removal tool to remove int ...
© 2018-2026 www.helantraad.com
