Hyundai Elantra: Engine Control System / Variable Intake Solenoid (VIS) Valve Repair procedures
| Inspection |
| 1. |
Turn the ignition switch OFF. |
| 2. |
Disconnect the VIS valve connector. |
| 3. |
Measure resistance between VIS valve terminals 1 and 2.
|
| Removal |
| 1. |
Turn the ignition switch OFF and disconnect the battery negative (-) cable. |
| 2. |
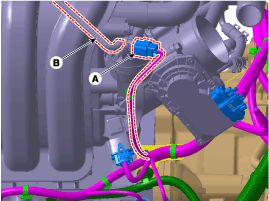
Disconnect the variable intake solenoid valve connector (A). |
| 3. |
Disconnect the vacuum hoses (B) from the valve. |
| 4. |
Remove the installation bolts, and then remove the valve from the surge tank.
|
| Installation |
|

|
| 1. |
Installation is reverse of removal.
|
 Variable Intake Solenoid (VIS) Valve Schematic Diagrams
Circuit Diagram
...
 Canister Close Valve (CCV) Description and Operation
Description
Canister Close Valve (CCV) is normally open and is installed
on the canister ventilation line. It seals evaporative emission control
system by shutting the canister from the atmosph ...
Other information:
Hyundai Elantra AD (2016-2020) Owners Manual: Tire Pressure Monitoring System
WARNING
Over-inflation or under-inflation can reduce tire life, adversely affect vehicle
handling, and lead to sudden tire failure that may cause loss of vehicle control
resulting in an accident.
Each tire, including the spare (if provided), should be checked monthly when
cold and inflated t ...
Hyundai Elantra AD (2016-2020) Owners Manual: Vehicle Stability Management (VSM). VSM operation
The Vehicle Stability Management (VSM) is a function of the Electronic Stability
Control (ESC) system. It helps ensure the vehicle stays stable when accelerating
or braking suddenly on wet, slippery and rough roads where traction over the four
tires can suddenly become uneven.
WARNING
Take t ...
