Hyundai Elantra: Trunk Lid / Trunk Lid Latch Repair procedures
Hyundai Elantra AD (2016-2020) Service Manual / Body (Interior and Exterior) / Trunk Lid / Trunk Lid Latch Repair procedures
| Replacement |
| [Trunk lid latch] |
|
|
| 1. |
Remove the tail trunk lid trim.
(Refer to Trunk Lid - "Trunk Lid Trim") |
| 2. |
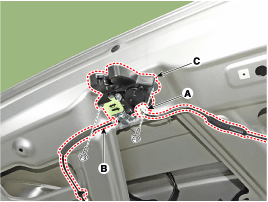
Disconnect the connector (A) and cable (B) and then loosen the bolt and remove the trunk lid latch (C).
|
| 3. |
To install, reverse the removal procedure.
|
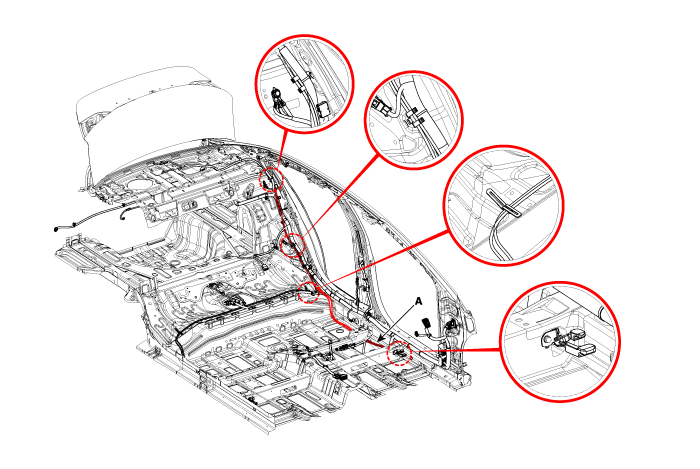
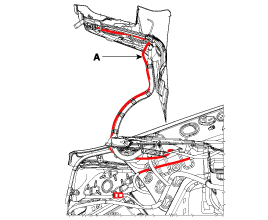
| [Trunk lid cable] |
| 1. |
Remove the front seat assembly.
(Refer to Front Seat - "Front Seat Assembly") |
| 2. |
Remove the rear seat assembly.
(Refer to rear Seat - "Rear Seat Assembly") |
| 3. |
Remove the floor console assembly.
(Refer to Floor Console - "Floor Console Assembly") |
| 4. |
Remove the center pillar lower trim.
(Refer to Interior Trim - "Center Pillar Trim") |
| 5. |
Remove the cowl side trim.
(Refer to Interior Trim - "Cowl Side Trim") |
| 6. |
Remove the luggage side trim.
(Refer to Interior Trim - "Cowl Side Trim") |
| 7. |
Remove the floor carpet.
(Refer to "Floor carpet") |
| 8. |
Remove the tail trunk lid trim.
(Refer to Trunk Lid - "Trunk Lid Trim") |
| 9. |
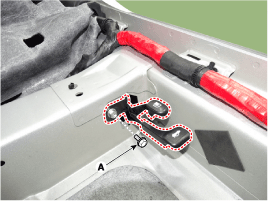
Loosen the trunk lid catch mounting bolt (A).
|
| 10. |
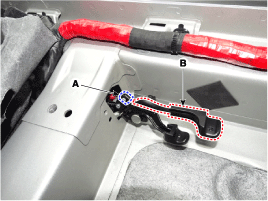
Detach the cable (A) and remove the trunk lid catch (B).
|
| 11. |
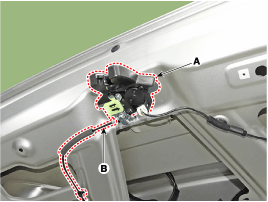
Remove the cable (B) from the trunk lid catch (A).
|
| 12. |
Remove the trunk lid cable (A).
|
| 13. |
To install, reverse the removal procedure.
|
| [Trunk lid catch] |
| 1. |
Remove the front seat assembly [LH].
(Refer to Front Seat - "Front Seat Assembly") |
| 2. |
Remove the front door scuff trim [LH].
(Refer to Interior Trim - "Front Door Scuff Trim") |
| 3. |
Remove the cowl side trim [LH].
(Refer to Interior Trim - "Cowl Side Trim") |
| 4. |
Remove the floor console assembly.
(Refer to Floor Console - "Floor Console Assembly") |
| 5. |
Separate the floor carpet to obtain space for removing the rear heating duct. |
| 6. |
Loosen the trunk lid catch mounting bolt (A).
|
| 7. |
Detach the cable (A) and remove the trunk lid catch (B).
|
| 8. |
To install, reverse the removal procedure.
|
 Trunk Lid Trim Repair procedures
Replacement
•
Put on gloves to prevent hand injuries.
•
When removing with a flat-tip screwdriver or remover, wrap protective tape around ...
 Trunk Lid Weatherstrip Repair procedures
Replacement
1.
Remove the trunk lid weatherstrip (A).
•
Do not apply sealant to the body.
2.
To intall, reverse the removal procedure.
...
Other information:
Hyundai Elantra AD (2016-2020) Service Manual: Rear Door Outside Handle Repair procedures
Replacement
1.
Remove the plug hole (B).
2.
After loosening the mounting bolt, remove the front door lock (A).
Tightening torque :
7.8 ~ 10.8 N.m (0.8 ~ 1.1 kgf.m, 5.8 ~ 8.0 lb-ft)
3.
Remove the rear door outside handle (A) by pushing it in the direction of arrow.
4.
To intall, ...
Hyundai Elantra AD (2016-2020) Service Manual: Front Seat Shield Inner Cover Components and Components Location
Component Location
1. Front seat shield inner cover
...
© 2018-2025 www.helantraad.com


