Hyundai Elantra: Timing System / Timing Chain Repair procedures
Hyundai Elantra AD (2016-2020) Service Manual / Engine Mechanical System / Timing System / Timing Chain Repair procedures
| Removal |
| 1. |
Remove the cylinder head cover.
(Refer to Cylinder Head Assembly - "Cylinder Head Cover") |
| 2. |
Set No.1 cylinder to TDC (Top dead center) on compression stroke.
|
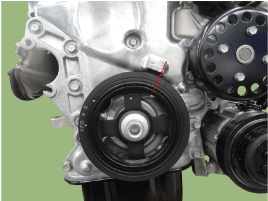

| 3. |
Remove the timing chain cover.
(Refer to Timing System - "Timing Chain Cover") |
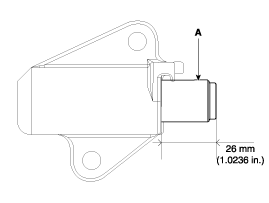
| 4. |
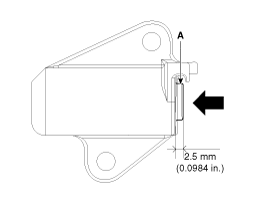
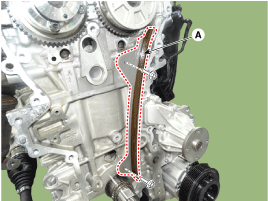
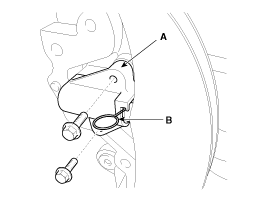
Remove the timing chain tensioner (A).
|
| 5. |
Remove the timing chain tensioner arm (A).
|
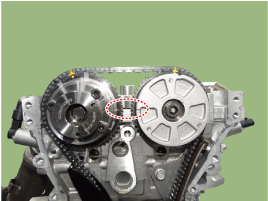
| 6. |
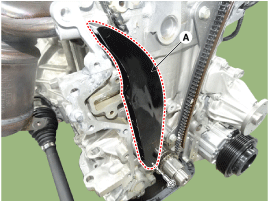
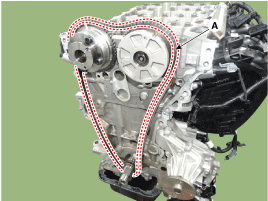
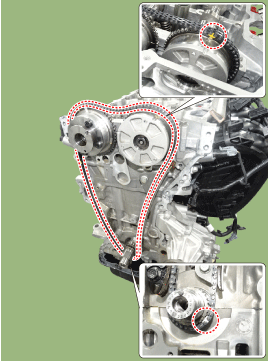
Remove the timing chain (A).
|
| 7. |
Remove the timing chain guide (A).
|
| Inspection |
Sprockets, Chain Tensioner, Chain Guide, Chain Tensioner Arm
| 1. |
Check the CVVT sprocket and crankshaft sprocket for abnormal wear, cracks, or damage. Replace if necessary. |
| 2. |
Inspect the tensioner arm and chain guide for abnormal wear, cracks, or damage. Replace if necessary. |
| 3. |
Check that the tensioner piston moves smoothly.
|
| Installation |
| 1. |
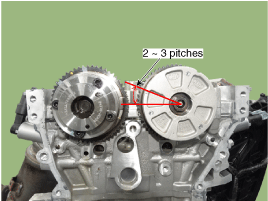
The TDC marks of the intake and exhaust CVVT sprockets are
slightly turned from the TDC position as shown when the timing chain is
removed.
|
| 2. |
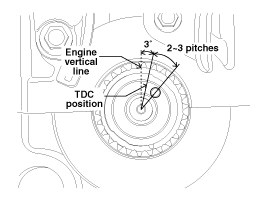
Turn the crankshaft clockwise (about 2~3 pitches) from the
TDC position (the dowel pin (A) of crankshaft is about 3° with the
engine vertical line) as rotation of the intake CVVT sprocket from the
TDC position.
|
| 3. |
Install the timing chain guide (A).
|
| 4. |
Install the timing chain tensioner arm (A).
|
| 5. |
Install the timing chain.
Crankshaft sprocket > Timing chain guide > Intake CVVT sprocket > Exhaust CVVT sprocket
|
| 6. |
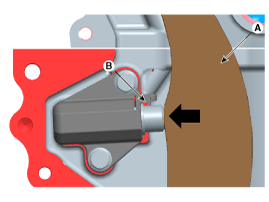
Install the timing chain auto tensioner (A) and remove the stopper pin (B).
|
| 7. |
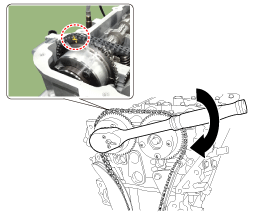
After rotating crankshaft 2 revolutions in regular direction
(clockwise viewed from front), confirm that the TDC marks on the intake
and exhaust CVVT sprockets are aligned with the top surface of cylinder
head.
|
| 8. |
Install the other parts reverse order of removal. |
|
 Timing Chain Components and Components Location
Components
1. Intake camshaft2. Exhaust camshaft3. Intake CVVT assembly4. Exhaust CVVT assembly5. Timing chain6. Timing chain tensioner arm7. Timing chain tensioner8. Timing chain guide
...

Other information:
Hyundai Elantra AD (2016-2020) Service Manual: Head Lamps Components and Components Location
Components
[Standard]
1. Head lamp (Low)2. Head lamp (High)3. Turn signal lamp4. Dust cap5. Position lamp6. Side marker
[HID]
1. Head lamp (Low - HID)2. Head lamp (High)3. Turn signal lamp4. Dust cap5. Side marker
...
Hyundai Elantra AD (2016-2020) Service Manual: Shift Cable Repair procedures
Removal
1.
Air cleaner assembly and air duct.
(Refer to Engine Mechanical System - "Air cleaner")
2.
Battery and battery tray.
(Refer to Engine Electrical System - "Battery")
3.
Remove the nut (A) from the manual control lever.
4.
Remove the shift cable (B) from the bracket (C) ...
© 2018-2026 www.helantraad.com
