Hyundai Elantra: Air Conditioning System / Photo Sensor Repair procedures
Hyundai Elantra AD (2016-2020) Service Manual / Heating, Ventilation and Air Conditioning / Air Conditioning System / Photo Sensor Repair procedures
| Inspection |
| 1. |
Turn the ignition switch ON. |
| 2. |
Connect the GDS. |
| 3. |
Emit intensive light toward the photo sensor using a lamp, and check the output voltage change. |
| 4. |
The voltage will rise with higher intensive light and reduce with lower intensive light.
|
| Replacement |
| 1. |
Disconnect the negative (-) battery terminal. |
| 2. |
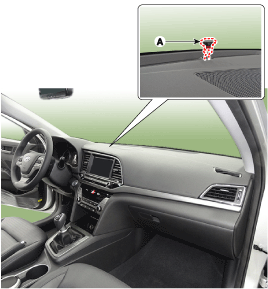
Using a screwdriver or remover, remove the photo sensor (A).
|
| 3. |
Install in the reverse order of removal. |
 Photo Sensor Description and Operation
Description
The photo sensor is located at the center of the defrost nozzles.
The photo sensor contains a photovoltaic (sensitive to
sunlight) diode. The solar radiation received by its light r ...
 Ambient Temperature Sensor Description and Operation
Description
The ambient temperature sensor is located at the front of the
condenser and detects ambient air temperature. It is a negative type
thermistor; resistance will increase with lower te ...
Other information:
Hyundai Elantra AD (2016-2020) Service Manual: Sun Roof
Components and Components Location
Component Location
1. Sunroof2. Sunroof switch3. Sunroof motor & controller
Schematic Diagrams
Circuit Diagram
Sunroof Switch Repair procedures
Inspection
1.
Disconnect the negative (-) battery terminal.
2.
Open the sunglass case cover from th ...
Hyundai Elantra AD (2016-2020) Service Manual: Description and Operation
Description
The charging system included a battery, an alternator with a built-in regulator, and the charging indicator light and wire.
The Alternator has eight built-in diodes, each rectifying AC current to DC current.
Therefore, DC current appears at alternator "B" terminal.
In addition, the ...
© 2018-2026 www.helantraad.com
