Hyundai Elantra: With Spare Tire / Jack label
The actual Jack label in the vehicle may differ from the illustration.
For more detailed specifications, refer to the label attached to the jack.
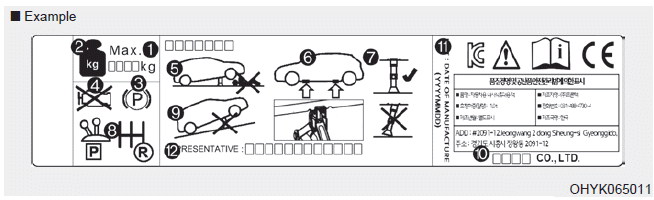
1. Model Name
2. Maximum allowable load
3. When using the jack, set your parking brake.
4. When using the jack, stop the engine.
5. Do not get under a vehicle that is supported by a jack.
6. The designated locations under the frame
7. When supporting the vehicle, the base plate of jack must be vertical under the
lifting point.
8. Shift into Reverse gear on vehicles with manual transmission or move the shift
lever to the P (Park) position on vehicles with Intelligent Variable Transmission
(IVT)/dual clutch transmission.
9. The jack should be used on firm level ground.
10. Jack manufacture
11. Production date
12. Representative company and address
 Changing tires
WARNING
A vehicle can slip or roll off of a jack causing serious injury or death to
you or those nearby. Take the following safety precautions:
Never place any portion of your body under a vehi ...
 With Tire Mobility Kit (TMK, if equipped) - Type A
For safe operation, carefully read and follow the instructions in this manual
before use.
(1) Compressor
(2) Sealant bottle
The Tire Mobility Kit is a temporary fix to the tire and we recommend ...
Other information:
Hyundai Elantra AD (2016-2020) Service Manual: Description and Operation
Warning Lamp Activation
Warning Lamp Behavior after Ignition On
As soon as the operating voltage is applied to the SRSCM
ignition input, the SRSCM activates the warning lamp for a LED lamp
check.
The lamp shall turn on for 6 seconds during the initialization phase and be turned off afterw ...
Hyundai Elantra AD (2016-2020) Owners Manual: Turn Signal, High Beam, Light ON Indicator Lights
Turn Signal Indicator Light
This indicator light blinks:
When you operate the turn signal indicator.
If any of the following occurs, there may be a malfunction with the turn signal
system.
- The turn signal indicator light illuminates but does not blink
- The turn signal indicator light bli ...
