Hyundai Elantra: Windshield Defrosting and Defogging / Automatic Climate Control System
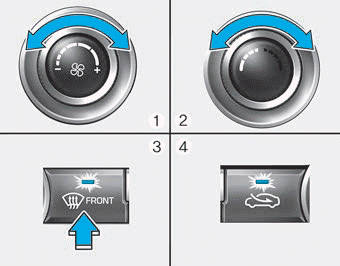
To defog inside windshield
1. Select desired fan speed.
2. Select desired temperature.
3. Press the defroster button ( ).
).
4. The outside (fresh) air position will be selected automatically.
If the outside (fresh) air position is not selected automatically, adjust the corresponding button manually.
If the  position
is selected, lower fan speed is adjusted to a higher fan speed.
position
is selected, lower fan speed is adjusted to a higher fan speed.
To defrost outside windshield
1. Set the fan speed to the highest (extreme right) position.
2. Set the temperature to the extreme hot (HI) position.
3. Press the defroster button ( ).
).
4. The outside (fresh) air position will be selected automatically.
If the  position
is selected, lower fan speed is adjusted to a higher fan speed.
position
is selected, lower fan speed is adjusted to a higher fan speed.
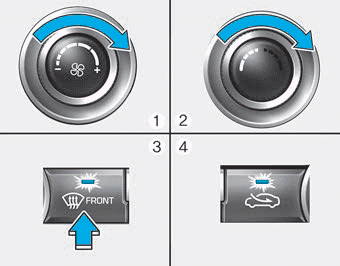
 Manual Climate Control System
To defog inside windshield
1. Select any fan speed except “0” position.
2. Select desired temperature.
3. Select the
or position.
4. The outside (fresh) air will be selected automatically ...
 Defogging logic
To reduce the probability of fogging up the inside of the windshield, the air
intake or air conditioning are controlled automatically according to certain conditions
such as or
position. To can ...
Other information:
Hyundai Elantra AD (2016-2020) Owners Manual: Intelligent Variable Transmission (IVT) Operation
The Intelligent Variable Transmission (IVT) automatically shifts depending on
speed, accelerate pedal position. The individual speeds are selected automatically,
depending on the position of the shift lever.
WARNING
To reduce the risk of serious injury or death:
ALWAYS check the surroundin ...
Hyundai Elantra AD (2016-2020) Service Manual: Torque Converter Control Solenoid Valve (T/CON_VFS) Repair procedures
Inspection
1.
Turn ignition switch OFF.
2.
Remove the battery and battery tray.
(Refer to Engine Electrical System - "Battery")
3.
Disconnect the solenoid valve connector (A).
4.
Measure resistance between sensor signal terminal and sensor ground terminal.
5.
Check that the ...
