Hyundai Elantra: Charging System / Alternator Repair procedures
Hyundai Elantra AD (2016-2020) Service Manual / Engine Electrical System / Charging System / Alternator Repair procedures
| Removal |
| 1. |
Turn ignition switch OFF and disconnect the negative (-) battery cable. |
| 2. |
Remove the drive belt.
(Refer to Engine Mechanical System - "Drive Belt") |
| 3. |
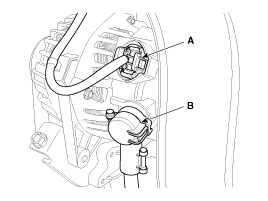
Disconnect the alternator connector (A) and the cable (B) from alternator "B" terminal.
|
| 4. |
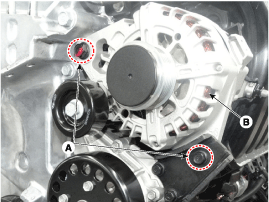
Remove the alternator (B) after loosening the mounting bolts (A).
|
| Installation |
| 1. |
Install in the reverse order of removal. |
| 2. |
Adjust the alternator belt tension after installation.
(Refer to Engine Mechanical System - "Drive Belt")
|
 Alternator Schematic Diagrams
Circuit Diagram
•
COM signal - When
controlling the voltage generated, the ECM sends the target voltage data
to the alternator via a PWM signal.(High voltage: 4V or h ...
 Battery Description and Operation
Description
[AGM Battery]
AGM battery is used for especially heavy load on the vehicle
network depending on equipment and requirements. AGM stands for
Absorbent Glass Material Battery; that is ...
Other information:
Hyundai Elantra AD (2016-2020) Service Manual: Body Side Molding
Delta Garnish Repair procedures
Replacement
•
Put on gloves to prevent hand injuries.
•
When removing with a flat-tip screwdriver or remover, wrap protective tape around the tools to prevent damage to components.
•
Take care not ...
Hyundai Elantra AD (2016-2020) Service Manual: Temperature Control Actuator Specifications
Specifications
Door PositionVoltage (V)Error DetectingMax. cooling0.3 ± 0.15 Low voltage : 0.1V or less High voltage : 4.9V or moreMax. heating4.7 ± 0.15
...
© 2018-2026 www.helantraad.com


