Hyundai Elantra: Interior Features / USB Charger
The USB charger is located inside the console box between the driverŌĆÖs seat and the front passengerŌĆÖs seat. Insert the USB charger into the USB port, and re-charge a smart phone or a tablet PC.
A charging status/charging completion message is displayed on a screen of a smart phone or a tablet PC.
A smart phone or a tablet PC may get warmer during the re-charging process. It does not indicate any malfunction with the charging system.
A smart phone or a tablet PC, which adopts a different re-charging method, may not be properly recharged. In this case, use an exclusive charger of your device.
This USB charging terminal will not allow you to play your media on the AVN unit. To connect your media to the AVN unit, use the USB port in the multi box and follow steps in chapter 4 - Multimedia.
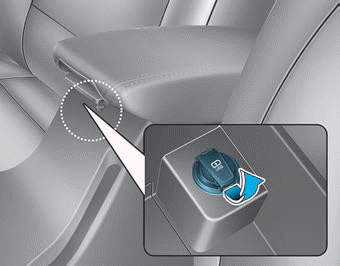
 Wireless Cellular Phone Charging System
[A]: Indicator light, [B]: Charging pad
On certain models, the vehicle comes equipped with a wireless cellular phone
charger.
The system is available when all doors are closed, and when the igni ...
 Clock, Clothes Hanger
Clock
WARNING
Do not adjust the clock while driving, you may lose your steering control
and cause an accident that results in severe personal injury or death.
For clock setting details, please re ...
Other information:
Hyundai Elantra AD (2016-2020) Owners Manual: Smart Cruise Control Vehicleto- Vehicle Distance
To set Vehicle-to-Vehicle Distance
When the Smart Cruise Control system is ON, you can set and maintain the distance
from the vehicle ahead of you without pressing the accelerator or brake pedal.
Each time the button is pressed, the vehicle to vehicle distance changes as follows:
For exampl ...
Hyundai Elantra AD (2016-2020) Service Manual: Rear Door Module Repair procedures
Replacement
1.
Remove the rear door window glass.
(Refer to Rear Door - "Rear Door Window Glass")
2.
Remove the rear door outside handle.
(Refer to Rear Door - "Rear Door Outside Handle")
3.
Loosen the rear door latch mounting screws.
Tightening torque :
6.9 ~ 10.8 N.m (0.7 ~ 1.1 ...
