Hyundai Elantra: Exterior Lights / Turn signals and lane change signals
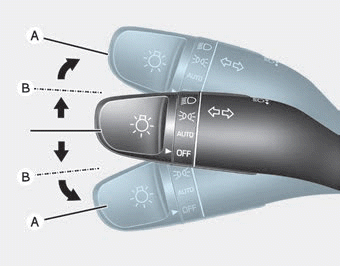
To signal a turn, push down on the lever for a left turn or up for a right turn in position (A).
If an indicator stays on and does not flash or if it flashes abnormally, one of the turn signal bulbs may be burned out and will require replacement.
Onetouch turn signal function
To activate the One Touch Turn Signal function, push the turn signal lever up or down to position (B) and then release it.
The lane change signals will blink 3, 5 or 7 times.
You can activate or deactivate the One Touch Turn Signal function or choose the number of blinking (3, 5, or 7) from the User Settings Mode (Light) on the LCD display (if equipped with supervision cluster).
For more details, refer to the "LCD Display" section in this chapter.
 High Beam Assist (HBA)
The High Beam Assist (HBA) is a system that automatically adjusts the headlamp
range (switches between high beam and low beam) according to the brightness of other
vehicles and road conditions.
...
 Battery saver function, Headlamp delay function
Battery saver function
The purpose of this feature is to help prevent the battery from being discharged.
The system automatically turns off the parking lamp when the key is removed (remote
key) o ...
Other information:
Hyundai Elantra AD (2016-2020) Service Manual: AVN Antenna Components and Components Location
Components
[SXM]
[SXM + GPS]
[SXM + GPS + LTE] ...
Hyundai Elantra AD (2016-2020) Service Manual: Heater Unit Repair procedures
Replacement
When prying with a flat-tip screwdriver or use a prying trim
tool, wrap it with protective tape, and apply protective tape around the
related parts, to prevent damage.
1.
Disconnect the negative (-) battery terminal.
2.
Recover the refrigerant with a ...
