
Hyundai Elantra: Engine Control System / Injector Repair procedures
| Inspection |
| 1. |
Turn the ignition switch OFF. |
| 2. |
Disconnect the injector connector. |
| 3. |
Measure resistance between the injector terminals 1 and 2. |
| 4. |
Check that the resistance is within the specification.
|
| Removal |
| 1. |
Turn the ignition switch OFF and disconnect the battery negative (-) cable. |
| 2. |
Release the residual pressure in fuel line.
(Refer to "Release Residual Pressure in Fuel Line" in this group).
|

| 3. |
Disconnect the injector connector (A). |
| 4. |
Disconnect the fuel feed tube quick-connector (B). |
| 5. |
Remove the installation bolt (C), and then remove the delivery pipe & injector assembly from the engine.
|
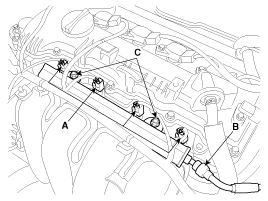
| 6. |
Remove the fixing clip (A), and then separate the injector from the delivery pipe.
|
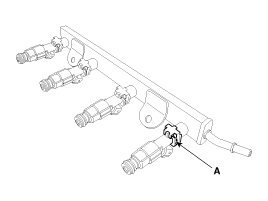
| Installation |
|
|
|
| 1. |
Installation is reverse of removal.
|
 Injector Schematic Diagrams
Circuit Diagram
...
 Purge Control Solenoid Valve (PCSV) Description and Operation
Description
Purge Control Solenoid Valve (PCSV) is installed on the
intake manifold and controls the evaporative purge between the canister
and the intake manifold. It is a normally closed sole ...
Other information:
Hyundai Elantra AD (2016-2020) Owners Manual: Wireless Cellular Phone Charging System
[A]: Indicator light, [B]: Charging pad
On certain models, the vehicle comes equipped with a wireless cellular phone
charger.
The system is available when all doors are closed, and when the ignition switch
is ON.
To charge a cellular phone
The wireless cellular phone charging system charge ...
Hyundai Elantra AD (2016-2020) Owners Manual: Parking Brake
Always set the parking brake before leaving the vehicle. To apply the parking
brake:
Firmly depress the brake pedal.
Pull up the parking brake lever as far as possible.
WARNING
To reduce the risk of SERIOUS INJURY or DEATH, do not operate the parking
brake while the vehicle is moving excep ...
