Hyundai Elantra: Windshield Glass / Repair procedures
Hyundai Elantra AD (2016-2020) Service Manual / Body (Interior and Exterior) / Windshield Glass / Repair procedures
| Replacement |
[Removal]
|

|

| 1. |
Remove the roof side molding.
(Refer to Body Side Molding - "Roof Side Molding") |
| 2. |
Remove the front pillar trim.
(Rear to Interior Trim - "Front Pillar Trim") |
| 3. |
Remove the inside rear view mirror assembly.
(Refer to Mirror - "Inside Rear View Mirror") |
| 4. |
Remove the cowl top cover.
(Refer to "Cowl Top Cover") |
| 5. |
Using a cutter (A) knife, carefully remove the windshield glass molding.
|


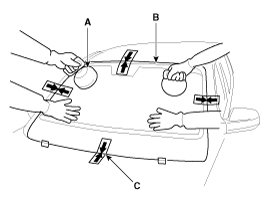
| 6. |
Cut off the sealant on the edge (B) while pulling the piano wire (A) to the left and right.
|

| 7. |
Put in a piano wire (A) through the corner of the windshield glass and insert wire grips into both ends of the wire.
|

| 8. |
Cut off the sealant on (A-A), (B-B), (C-C), while pulling a piano wire (A) to the left and right.
|

| 9. |
Remove the windshield glass (B) carefully using the glass holder (A).
|

[Installtion]
| 1. |
Using a knife, scrape the remaining sealant around the body
panel leaving about 2mm-thick sealant (0.0079 in.) on the bonding
surface. If installing a new windshield glass, make alignment marks on
the windshield glass and the body.
|
| 2. |
Clean the edges of body panel and windshield glass with
alcohol. Apply glass primer to the edges of windshield glass and attach
the molding onto the edges. |
| 3. |
Apply the body primer to the bonding surface of body panel.
|

| 4. |
Apply the glass primer to the outer edge of windshield glass.
|

| 5. |
Apply a bead of sealant (B) around the windshield glass (A).
|

| 6. |
Using the glass holder (A), adjust the windshield glass (B)
to fit the alignment marks (C) on the body and lightly push the
windshield glass to make the edges fully seated on the bonding surface
of body.
|
| 7. |
To make sure that the applied sealant is completely
hardened, leave the car on a flat surface for at least 4 hours after
installing the windshield glass.
|
| 8. |
Conduct a leak testing.
|
| 9. |
Install the cowl top cover.
(Refer to "Cowl Top Cover") |
| 10. |
Install the inside rear view mirror assembly.
(Refer to Mirror - "Inside Rear View Mirror") |
| 11. |
Install the front pillar trim.
(Rear to Interior Trim - "Front Pillar Trim") |
| 12. |
Install the roof side molding.
(Refer to Body Side Molding - "Roof Side Molding") |
 Components and Components Location
Components
1. Windshield glass
...

Other information:
Hyundai Elantra AD (2016-2020) Service Manual: Repair procedures
Adjustment
1.
Place the car on a flat surface and check whether the body and trunk lid are well-aligned.
2.
After loosening the trunk lid hinge (A) mounting bolt, adjust the trunk lid by moving it up and down or from side to side.
3.
Adjust the gap between the trunk lid and body by turni ...
Hyundai Elantra AD (2016-2020) Service Manual: Rear Seat Folding Lever Repair procedures
Replacement
1.
Fold the rear seat back assembly (A) by pulling the folding lever in the direction of the arrow.
2.
Loosen the mounting clips and bolts, remove the rear seat folding lever (A).
3.
To install, reverse the removal procedure. ...
© 2018-2025 www.helantraad.com
