Hyundai Elantra: Engine Control System / ETC (Electronic Throttle Control) System Description and Operation
Hyundai Elantra AD (2016-2020) Service Manual / Engine Control/Fuel System / Engine Control System / ETC (Electronic Throttle Control) System Description and Operation
| Description |
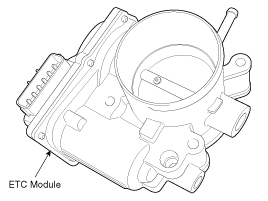
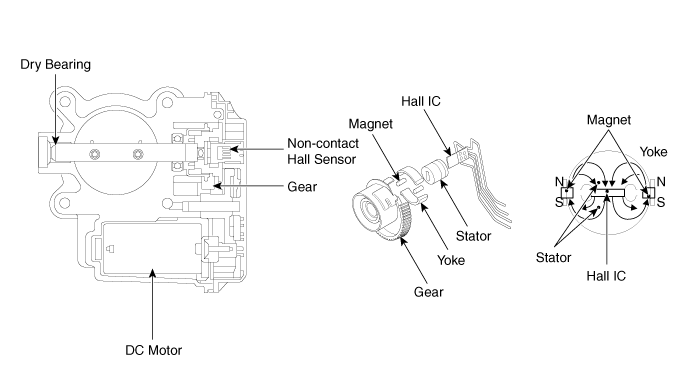
The Electronic Throttle Control (ETC) System consists of a
throttle body with an integrated control motor and throttle position
sensor (TPS). Instead of the traditional throttle cable, an Accelerator
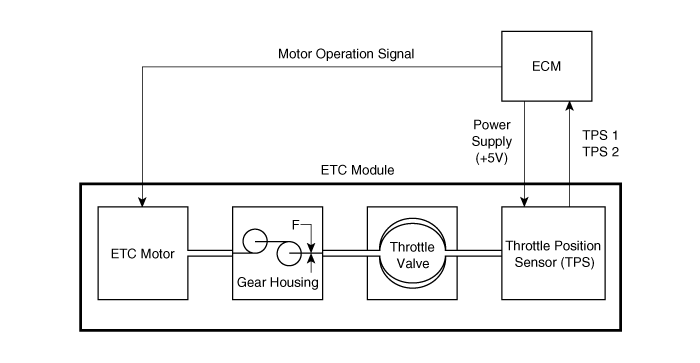
Position Sensor (APS) is used to receive driver input. The ECM uses the
APS signal to calculate the target throttle angle; the position of the
throttle is then adjusted via ECM control of the ETC motor. The TPS
signal is used to provide feedback regarding throttle position to the
ECM. Using ETC, precise control over throttle position is possible; the
need for external cruise control modules/cables is eliminated.


| Schematic Diagram |

 Engine Control Module (ECM) Repair procedures
Removal
•
When replacing the ECM, the vehicle equipped withthe immobilizer must be performed procedure asbelow.
[In the case of installing used ECM]
1) Perform "ECM Neu ...
 ETC (Electronic Throttle Control) System Troubleshooting
Fail-Safe Mode
ItemFail-SafeETC MotorThrottle valve stuck at 7°TPSTPS 1 faultReplace it with TPS 2TPS 2 faultReplace it with TPS 1TPS 1,2 faultThrottle valve stuck at 7°APSAPS 1 faultReplace it ...
Other information:
Hyundai Elantra AD (2016-2020) Service Manual: Components and Components Location
Component Location (1)
1. Interior antenna 12. Interior antenna 23. Door outside handle4. Smart key unit (SMK)5. Buzzer
Component Location (2)
1. Trunk open switch2. Bumper antenna3. Trunk atenna
...
Hyundai Elantra AD (2016-2020) Owners Manual: Sensor to Detect Distance to the Vehicle Ahead
The Smart Cruise Control uses a sensor to detect distance to the vehicle ahead.
If the sensor is covered with dirt or other foreign matter, the vehicle to vehicle
distance control may not operate correctly.
Always keep the sensor clean.
Warning message
Smart Cruise Control disabled. Radar ...
© 2018-2026 www.helantraad.com
