Hyundai Elantra: Engine And Transaxle Assembly / Engine Mounting Repair procedures
Hyundai Elantra AD (2016-2020) Service Manual / Engine Mechanical System / Engine And Transaxle Assembly / Engine Mounting Repair procedures
| Removal and Installation |
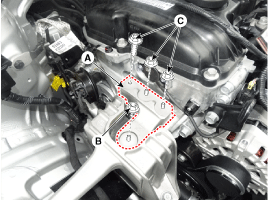
Engine Mounting Bracket
| 1. |
Remove the engine room under cover.
(Refer to Engine And Transaxle Assembly - "Engine Room Under Cover") |
| 2. |
Install the jack under the edge of lower oil pan to support the engine.
|

| 3. |
Remove the engine mounting support bracket (A).
|
| 4. |
Remove the engine mounting bracket (A).
|
| 5. |
Install in the reverse order of removal. |
Roll Rod Bracket
| 1. |
Remove the engine room under cover.
(Refer to Engine And Transaxle Assembly - "Engine Room Under Cover") |
| 2. |
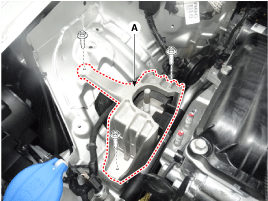
Remove the roll rod bracket (A).
|
| 3. |
Remove the roll rod mounting support bracket (A).
|
| 4. |
Install in the reverse order of removal. |
Transaxle Mounting Bracket
| 1. |
Remove the air duct and air cleaner assembly.
(Refer to Intake And Exhasut System - "Air Cleaner") |
| 2. |
Remove the battery.
(Refer to Engine Electrical System - "Battery") |
| 3. |
Remove the ECM (Engine Control Module).
(Refer to Engine Control / Fuel System - "Engine Control Module (ECM)") |
| 4. |
Remove the battery tray.
(Refer to Engine Electrical System - "Battery") |
| 5. |
Remove the engine room under cover.
(Refer to Engine And Transaxle Assembly - "Engine Room Under Cover") |
| 6. |
Install the jack under the transaxle to support it. |
| 7. |
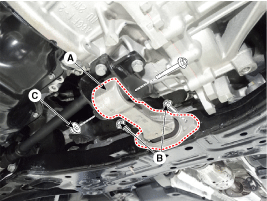
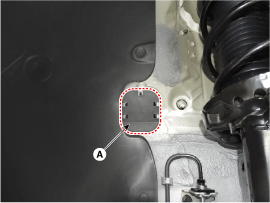
Remove the service cover (A).
|
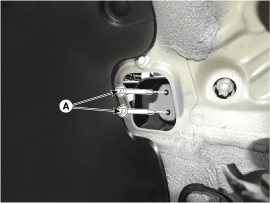
| 8. |
Remove the transaxle support bracket mounting bolts (A).
|
| 9. |
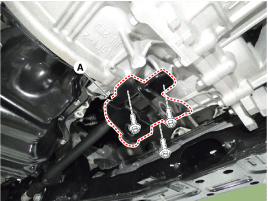
Remove the transaxle mounting bracket (A).
|

| 10. |
Install in the reverse order of removal. |
 Engine Mounting Components and Components Location
Components
1. Transaxle mounting bracket2. Roll rod bracket3. Engine mounting bracket4. Engine mounting support bracket
...
 Engine And Transaxle Assembly Repair procedures
Removal
•
Use fender covers to avoid damaging painted surfaces.
•
To avoid damage, unplug the wiring connectors carefully while holding the connector portion.
...
Other information:
Hyundai Elantra AD (2016-2020) Service Manual: Crash Pad Under Cover Repair procedures
Replacement
•
Put on gloves to prevent hand injuries.
•
When removing with a flat-tip screwdriver or remover, wrap protective tape around the tools to prevent damage to components.
•
Use a plastic panel removal tool to remove int ...
Hyundai Elantra AD (2016-2020) Service Manual: Front Seat Shield Inner Cover Components and Components Location
Component Location
1. Front seat shield inner cover
...
© 2018-2026 www.helantraad.com
