Hyundai Elantra: Timing System / Drive Belt Repair procedures
| 1. |
Remove the drive belt.
| (1) |
Using the wrench, turning the drive belt tensioner (A) counterclockwise. 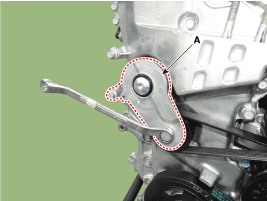
|
| (2) |
Disconnect the drive belt (A). 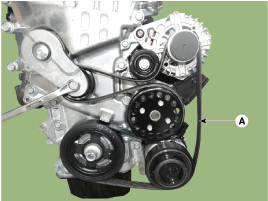
|
| (3) |
Remove the drive belt tensioner (A) and then remove the drive belt (B). 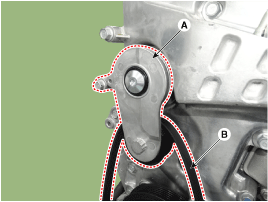
|
|
| 1. |
Check belt for maintenance and abnormal wear of V-ribbed part. Replace if necessary.
| • |
Do not bend, twist or turn the drive belt inside out. |
| • |
Do not allow the drive belt to come into contact with oil, water and steam. |
|
|
| 2. |
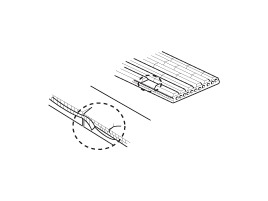
Visually check the belt for excessive wear, frayed cords etc.
If any defect has been found, replace the drive belt.
| • |
Cracks on the rib side of a belt are considered acceptable. If the belt has chunks missing from the ribs, it should be replaced. |
|
|
Drive belt tension measurement and adjustment
Measure the belt tension using a mechanical tension gauge or a sonic tension meter.
Belt tension
New belt:
637.4 ~ 735.5 N (65 ~ 75 kgf, 143.3 ~ 165.3 lbf)
Used belt:
441.3 ~ 539.4 N (45 ~ 55 kgf, 99.2 ~ 121.3 lbf)
|
| • |
If the engine has run for 5 minutes or more, the belt tension must be adjusted as a used belt. |
| • |
When installing the V-ribbed belt, all grooves on the pulley should be covered with belt ribs. |
| • |
A loose belt causes slip noise. |
| • |
Too tight belt cause bearing of alternator and water pump to damage. |
|
| Using a mechanical tension gauge (BT-33-73F, BTG-2 type) |
| 1. |
While pressing the handle (A) of the gauge, insert the belt
(B) between pulley and pulley (or idler) into the gap between spindle
(C) and hook (D). 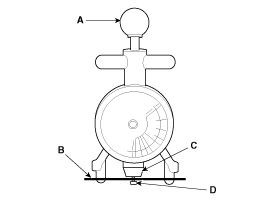
|
| 2. |
After releasing the handle (A), read a value on the dial pointed by the indicator (B). 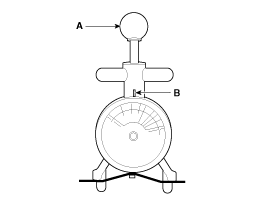
|
| Using a sonic tension meter (U-505/507 type) |
| 1. |
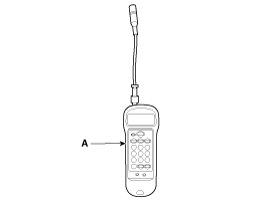
Input the belt specifications into the tension meter (A).
Belt type
| Location of measurement
| Input data
| M (Mass, g/m.rib)
| W (Width, rib)
| S (Span, mm)
| With A/C
| Crankshaft pulley to A/C compressor pulley
| 14.1
| 006.0
| 187
| Without A/C
| Crankshaft pulley to alternator pulley
| 14.1
| 006.0
| Actual measurement value
|
| • |
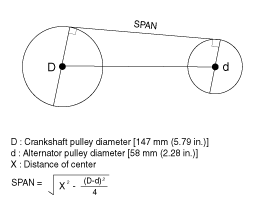
Measurement of S (Span): Caculate average value after measuring the distance 3~4 times. |
|
|
| 2. |
Locate the micro phone (B) close to the center of belt span
(A) and bounce the belt by finger 2~3 times. Read a value on the
display.
[With A/C] 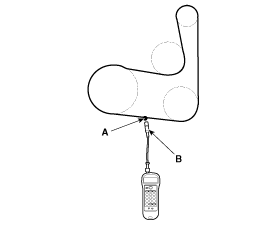
[Without A/C] 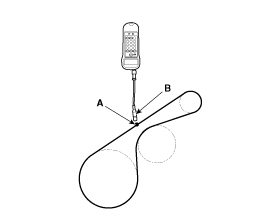
|
| 1. |
Install the drive belt.
| (1) |
Install the drive belt (B) and then install the drive belt tensioner (A).
Tightening torque :
center bolt : 29.4 ~ 41.2 N.m (3.0 ~ 4.2 kgf.m, 21.7 ~ 30.4 lb-ft)
fixing bolt : 39.2 ~ 49.0 N.m (4.0 ~ 5.0 kgf.m, 28.9 ~ 36.2 lb-ft)
|

|
| (2) |
Using the wrench, turning the drive belt tensioner (A) counterclockwise. 
|
| (3) |
Connect the drive belt (A). 
|
|
Components
1. Intake camshaft2. Exhaust camshaft3. Intake CVVT assembly4. Exhaust CVVT assembly5. Timing chain6. Timing chain tensioner arm7. Timing chain tensioner8. Timing chain guide9. Timing ...
Removal and Installation
1.
Remove the drive belt.
(Refer to Timing System - "Drive Belt")
2.
Remove the idler (A).
Tightening torque :
39.2 ~ 49.0N.m (4.0 ~ 5.0kgf.m, 28.9 ~ 36.2lb-ft)
...
 Components and Components Location
 Idler Repair procedures


