Hyundai Elantra: Driveshaft Assembly / BJ Boot Repair procedures
| Removal |
| 1. |
Remove the front driveshaft.
(Refer to Driveshaft Assembly - "Front Driveshaft") |
| 2. |
Remove the TJ joint assembly.
(Refer to Driveshaft Assembly - "TJ Joint") |
| 3. |
Remove the Dynamic damper.
(Refer to Driveshaft Assembly - "Dynamic Damper") |
| 4. |
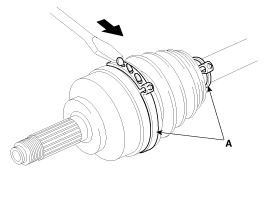
Using a plier or flat-tipped (-) screwdriver, remove the BJ boot bands (A).
|
| 5. |
Remove the BJ boot. |
| 6. |
Install in the reverse order of removal.
|
| 7. |
Check the front alignment.
(Refer to Suspension System - "Front Alignment") |
| Installation |
| 1. |
To install, reverse the removal procedure. |
| 2. |
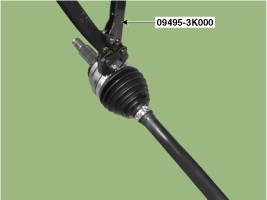
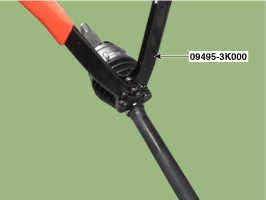
Using the SST(09495-3K000), secure the BJ boot bands.
|
| 3. |
Install the TJ joint assembly.
(Refer to Driveshaft Assembly - "TJ joint") |
| 4. |
Install the front driveshaft.
(Refer to Driveshaft Assembly - "Front Driveshaft") |
| 5. |
Check the front alignment.
(Refer to Suspension System - "Front Alignment") |
 BJ Boot Components and Components Location
components (1)
1. BJ assembly 2. BJ circlip 3. BJ boot band 4. BJ boot 5. Dynamic damper band 6. Dynamic damper7. Shaft8. TJ boot band9. TJ boot10. Spider assembly11. Snap ring12. TJ housing13. C ...
 Rear Axle Assembly
Rear Hub - Carrier Components and Components Location
Components
[Disc type]
1. Rear brake disc2. Rear hub bearing3. Backing plate4. Bracket
[Drum type]
1. Rear brake assembly2. Hub & ...
Other information:
Hyundai Elantra AD (2016-2020) Service Manual: Memory power seat switch Repair procedures
Removal
1.
Disconnect the negative (-) battery terminal.
2.
Remove the driver door trim.
(Refer to Body - "Front Door Trim")
3.
Disconnect the memory power seat switch connector (A).
4.
Remove the memory power switch (A) after disengaging the mounting clips.
Installation
1.
Ins ...
Hyundai Elantra AD (2016-2020) Service Manual: Description and Operation
System Overview
RPAS (Rear Parking Assist System) is an electronic driving
aid that warns the driver to be cautious while parking or driving at low
speed. The sensor uses ultrasonic waves to detect objects within
proximity of the vehicle.
RPAS consists of four RPS sensors which are detecti ...


