Hyundai Elantra: Engine Control System / Variable Charge Motion Actuator (VCMA) Repair procedures
Hyundai Elantra AD (2016-2020) Service Manual / Engine Control/Fuel System / Engine Control System / Variable Charge Motion Actuator (VCMA) Repair procedures
| Inspection |
| 1. |
Turn ignition switch OFF. |
| 2. |
Disconnect the VCMA connector. |
| 3. |
Check that the VCMA is not stuck by foreign material. |
| 4. |
Measure resistance between motor (+) and (-) control terminals of the motor. |
| 5. |
Check that the resistance is within the specification.
|
| 6. |
Measure resistance between voltage supply terminal and ground terminal of the position sensor. |
| 7. |
Check that the resistance is within the specification.
|
| Removal |
| 1. |
Turn the ignition switch OFF and disconnect the battery negative (-) cable. |
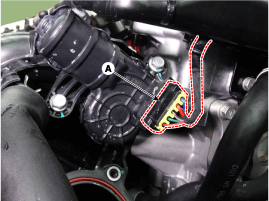
| 2. |
Disconnect the VCMA connector (A).
|
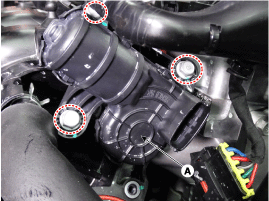
| 3. |
Remove the VCMA (A) after removing 3 installation bolts.
|
| Installation |
|
|
| 1. |
Installation is reverse of removal.
|
 Variable Charge Motion Actuator (VCMA) Schematic Diagrams
Circuit diagram
...
Other information:
Hyundai Elantra AD (2016-2020) Service Manual: Passenger Airbag (PAB) Module Repair procedures
Removal
1.
Disconnect the battery negative cable and wait for at least three minutes before beginning work.
2.
Remove the glove box housing.
(Refer to Body - "Glove Box Upper Cover Assembly")
3.
Remove the passenger airbag mounting bolts.
4.
Disconnect the passenger airbag connector ...
Hyundai Elantra AD (2016-2020) Service Manual: Specifications
Specification
ItemSpecificationPower source3VOperating temperature-30┬░C ~ +75┬░C (-22┬░F ~ +167┬░F)RF ModulationFSKLF ModulationASKRF frequency433.92 MHzButton number4FunctionDoor lockDoor unlockTailgate unlock
...
┬® 2018-2026 www.helantraad.com


