Hyundai Elantra: Audio / Speakers Repair procedures
| Inspection |
| 1. |
Troubleshooting for Speaker
| ||||||||||||||||||||||||||||||||||||||||||||


| Removal |
| 1. |
Disconnect the negative (-) battery terminal. |
| 2. |
Remove the front door trim.
(Refer to Body - "Front Door Trim") |
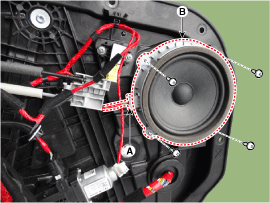
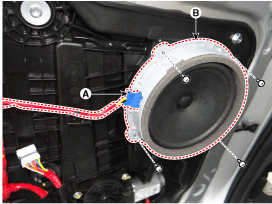
| 3. |
Remove the front door speaker (B) after disconnecting the connector (A) and loosening the screws.
|
| 1. |
Disconnect the negative (-) battery terminal. |
| 2. |
Remove the front door trim.
(Refer to Body - "Front Door Trim") |
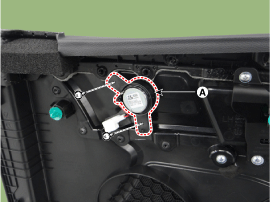
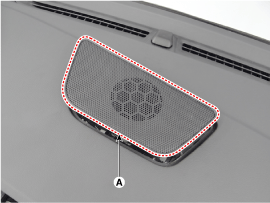
| 3. |
Remove the tweeter speaker (A) after loosening the screws.
|
| 1. |
Disconnect the negative (-) battery terminal. |
| 2. |
Remove the rear door trim.
(Refer to Body - "Rear Door Trim") |
| 3. |
Remove the rear door speaker (B) after disconnecting the connector (A) and loosening the screws.
|
|
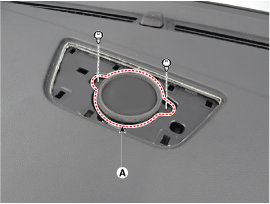
| 1. |
Using a screwdriver or remover, remove the crash pad center speaker grille (A).
|
| 2. |
Remove the center speaker (A) after disconnect the connector and loosening the screws.
|
| 1. |
Remove the rear seat.
(Refer to Body - "Rear Seat") |
| 2. |
Remove the package tray trim.
(Refer to Body - "Rear Package Tray Trim") |
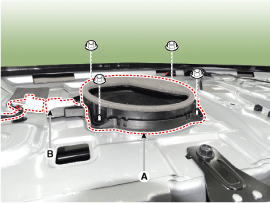
| 3. |
Remove the sub woofer speaker (A) after disconnect the connector and loosening the bolts.
|
| Installation |
| 1. |
Install the front door speaker. |
| 2. |
Install the front door trim. |
| 3. |
Connect the negative (-) battery terminal. |
| 1. |
Install the front door tweeter speaker. |
| 2. |
Install the front door trim. |
| 3. |
Connect the negative (-) battery terminal. |
| 1. |
Install the rear door speaker. |
| 2. |
Install the front door trim. |
| 3. |
Connect the negative (-) battery terminal. |
| 1. |
Install the center speaker. |
| 2. |
Install the center speaker grille. |
| 1. |
Install the subwoofer speaker. |
| 2. |
Install the rear package tray and rear seat. |
|
 Audio Unit Repair procedures
Removal
1.
Disconnect the negative (-) battery terminal.
2.
Remove the center fascia panal.
(Refer to Body - "Center Fascia Panal")
3.
Remove the audio head unit (A) after loosening the s ...
 Antenna Repair procedures
Inspection
Glass Antenna Test
1.
Wrap aluminum foil (A) around the tip of the tester probe (B) as shown.
2.
Touch one tester probe to the glass antenna terminal (A) and
move the other teste ...
Other information:
Hyundai Elantra AD (2016-2020) Service Manual: Memory power seat unit Repair procedures
Removal
1.
Disconnect the negative (-) battery terminal.
2.
Remove the driver seat assembly.
(Refer to Body - "Front Seat Assembly")
3.
Loosening the IMS unit mounting screws.
4.
Disconnect the IMS module connectors (B) and then remove the IMS unit (A).
Installation
1.
Install ...
Hyundai Elantra AD (2016-2020) Service Manual: Overdrive Clutch Control Solenoid Valve(OD/C_VFS) Components and Components Location
Components Location
1. 26 Brake Control Solenoid Valve (26/B)2. 35R Clutch Control Solenoid Valve (35R/C)3. Underdrive Brake Control Solenoid Valve (UD/B)4. Overdrive Clutch Control Solenoid Valve (OD/C)5. SS-A Solenoid Valve (ON/OFF)6. Torque Converter Control Solenoid Valve (T/CON)7. Line Pre ...
