Hyundai Elantra: Seat Belt Pretensioner / Emergency Fastening Device (EFD) Repair procedures
Hyundai Elantra AD (2016-2020) Service Manual / Restraint / Seat Belt Pretensioner / Emergency Fastening Device (EFD) Repair procedures
| Removal |
| 1. |
Disconnect the battery negative cable and wait for at least 3 minutes before beginning work. |
| 2. |
Remove the front seat.
(Refer to Body - "Front Seat Assembly") |
| 3. |
Remove the rear seat.
(Refer to Body - "Rear Seat Assembly") |
| 4. |
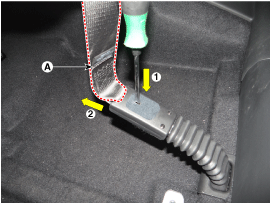
Separate the front seat belt (A) from the emergency fastening device.
|
| 5. |
Remove the door scuff trim.
(Refer to Body - "Interior Trim") |
| 6. |
Remove the center pillar trim.
(Refer to Body - "Interior Trim") |
| 7. |
Remove the floor carpet assembly.
(Refer to Body - "Floor Carpet") |
| 8. |
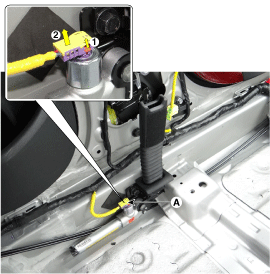
Disconnect the emergency fastening device connector (A).
|
| 9. |
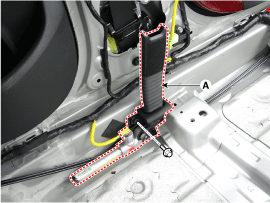
Remove the emergency fastening device (A) after loosening the monuting bolt.
|
| Installation |
| 1. |
Disconnect the negative (-) cable from battery and wait for at least three minutes. |
| 2. |
Install the emergency fastening device with the mounting bolt.
|
| 3. |
Connect the emergency fastening device connector (A).
|
| 4. |
Install the floor carpet assembly.
(Refer to Body - "Floor Carpet") |
| 5. |
Install the center pillar trim.
(Refer to Body - "Interior Trim") |
| 6. |
Install the door scuff trim.
(Refer to Body - "Interior Trim") |
| 7. |
Connect the front seat belt to the emergency fastening device. |
| 8. |
Install the rear seat.
(Refer to Body - "Rear Seat Assembly") |
| 9. |
Install the front seat.
(Refer to Body - "Front Seat Assembly") |
| 10. |
Reconnect the battery negative cable. |
| 11. |
After installing the EFD system, confirm proper system operation :
Turn the ignition switch ON; the SRS indicator light should turn on for about six seconds and then go off. |
 Emergency Fastening Device (EFD) Description and Operation
Description
The Emergency Fastening Device (EFD) operates at the same
time with the Seat Belt Pretensioner when it satisifies the deployment
condition after a collision. It is an auxiliary equi ...
 Brake System
...
Other information:
Hyundai Elantra AD (2016-2020) Service Manual: Components and Components Location
Components
1. Front right Pressure Impact Sensor (FIS)2. Supplemental Restraint System Control Module (SRSCM)3. Front left Pressure Impact Sensor (FIS)4. Gravity Side Impact Sensor (G-SIS)5. Pressure Side Impact Sensor (P-SIS)
...
Hyundai Elantra AD (2016-2020) Service Manual: Important Safety Notice
General Information
Proper service methods and repair procedures are essential
for safe, reliable operation of all motor vehicles as well as personal
safety of the operator. The service procedures and descriptions in this
shop manual provide general directions for service and repair.
Th ...
© 2018-2025 www.helantraad.com


