Hyundai Elantra: With Tire Mobility Kit (TMK, if equipped) - Type B / Components of the Tire Mobility Kit
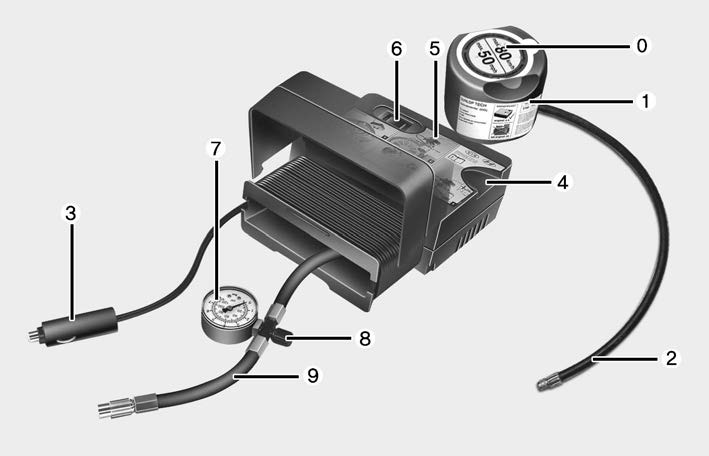
0. Speed restriction label
1. Sealant bottle and label with speed restriction
2. Filling hose from sealant bottle to wheel
3. Connectors and cable for power outlet direct connection
4. Holder for the sealant bottle
5. Compressor
6. ON/OFF switch
7. Pressure gage for displaying the tire inflation pressure
8. Screw cap for reducing tire inflation pressure
9. Hose to connect compressor and sealant bottle or compressor and wheel
Connectors, cable and connection hose are stored in the compressor housing.
Strictly follow the specified sequence, otherwise the sealant may escape under high pressure.
WARNING
Do not use the tire sealant after the sealant has expired (i.e. pasted the expiration date on the sealant container). This can increase the risk of tire failure.
WARNING
- Keep out of reach of children.
- Avoid contact with eyes.
- Do not swallow.
 Notes on the safe use of the Tire Mobility Kit
Park your car at the side of the road so that you can work with the Tire
Mobility Kit away from moving traffic.
To be sure your vehicle will not move, even when you’re on fairly level
gro ...
 Using the Tire Mobility Kit
1. Detach the speed restriction label (0) from the sealant bottle (1), and place
it in a highly visible place inside the vehicle such as on the steering wheel to
remind the driver not to drive too ...
Other information:
Hyundai Elantra AD (2016-2020) Service Manual: Speakers Repair procedures
Inspection
1.
Troubleshooting for Speaker
(1)
Basic inspection of speaker
Inspect the sound from speaker after verifying that the
speaker mounting screws is removed and the wiring connector is connected
precisely to remove vibration transmitted from body trims and
surrounding parts.
...
Hyundai Elantra AD (2016-2020) Service Manual: Ignition System
Description and Operation
Description
Ignition timing is controlled by the electronic control ignition timing system.
The standard reference ignition timing data for the engine
operating conditions are pre-pro grammed in the memory of the ECM
(Engine Control Module).
The engine operating ...
