Hyundai Elantra: Cylinder Block / Crankshaft Repair procedures
Hyundai Elantra AD (2016-2020) Service Manual / Engine Mechanical System / Cylinder Block / Crankshaft Repair procedures
| Disassembly |
|

|

| 1. |
Remove the engine assembly from the vehicle.
(Refer to Engine And Transaxle Assembly - “Engine And Transaxle Assembly”) |
| 2. |
Remove the transaxle assembly from the engine assembly.
Automatic Transaxle
(Refer to Automatic Transaxle System - "Automatic Transaxle") |
| 3. |
Remove the drive plate.
(Refer to Cylinder Block - "Drive Plate") |
| 4. |
Remove the rear oil seal.
(Refer to Cylinder Block - “Rear Oil Seal”) |
| 5. |
Install the engine to engine stand for disassembly. |
| 6. |
Remove the timing chain.
(Refer to Timing System - “Timing Chain”) |
| 7. |
Remove the water pump assembly.
(Refer to Cooling System - “Water Pump”) |
| 8. |
Remove the water inlet fitting and the thermostat assembly.
(Refer to Cooling System - “Electric Thermostat (ECT)“) |
| 9. |
Remove the intake manifold.
(Refer to Intake And Exhaust System - "Intake Manifold") |
| 10. |
Remove the A/C compressor.
(Refer to Heating, Ventilation Air conditioning -"Compressor") |
| 11. |
Remove the exhaust manifold.
(Refer to Intake And Exhaust System - "Exhaust Manifold") |
| 12. |
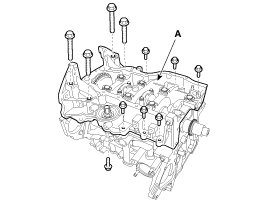
Remove the cylinder head assembly.
(Refer to Cylinder Head Assembly - "Cylinder Head") |
| 13. |
Remove the oil filter.
(Refer to Lubrication System - “Engine Oil”) |
| 14. |
Remove the oil screen.
(Refer to Lubrication System - “Oil Pan”) |
| 15. |
Remove the piston and connecting rod assemblies.
(Refer to Cylinder Block - "Piston and Connecting Rod") |
| 16. |
Check the crankshaft bearing oil clearance. |
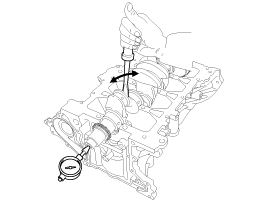
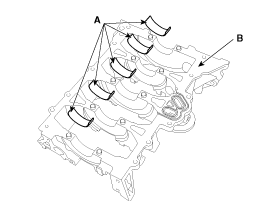
| 17. |
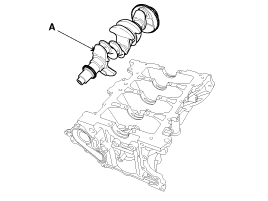
Remove the lower crankcase (A).
|
| 18. |
Check the crankshaft end play. |
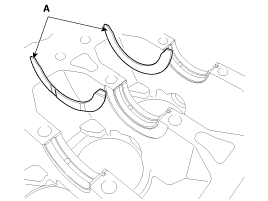
| 19. |
Lift the crankshaft (A) out of the engine, being careful not to damage journals.
|
| Inspection |
| 1. |
Check the crankshaft bearing oil clearance.
| |||||||||||||||||||||||||||||||||||||||||||||||||||||||||||||||||||||||||||||||||||||||||


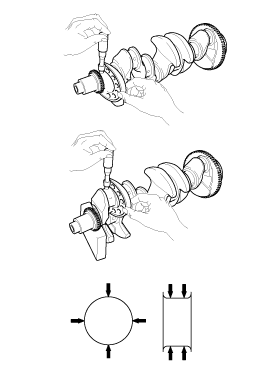
| 2. |
Check crankshaft end play.
Using a dial indicator, measure the thrust clearance while prying the crankshaft back and forth with a screwdriver.
If the end play is greater than maximum, replace the center bearing.
|
| 3. |
Inspect main journals and crank pins.
Using a micrometer, measure the diameter of each main journal and crank pin.
|
| Reassembly |
|
| 1. |
Install the crankshaft main bearings.
|
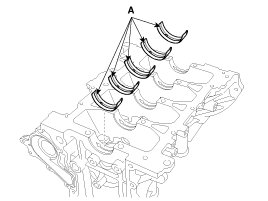
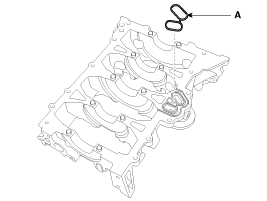
| 2. |
Install the thrust bearings.
Install the 2 thrust bearings (A) on both sides of the No.3 journal of the cylinder block with the oil groove facing out.
|
| 3. |
Place the crankshaft (A) on the cylinder block.
|
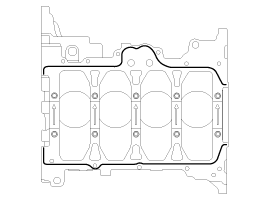
| 4. |
Apply liquid sealant on the top surface of the lower crankcase.
|

| 5. |
Place the lower crankcase on the cylinder block. |
| 6. |
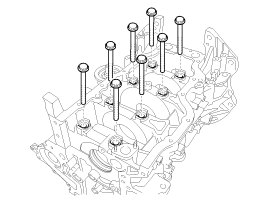
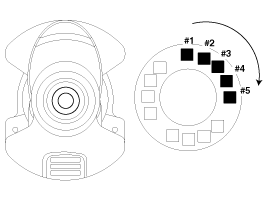
Install the main bearing cap bolts.
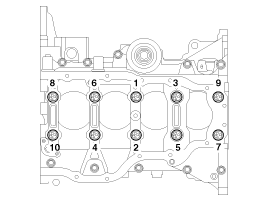
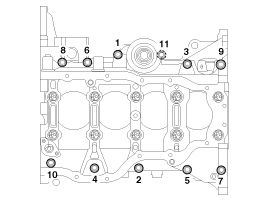
Using SST (09221-4A000), install and tighten the 10 main bearing cap bolts, in several passes, in the sequence as shown.
|
| 7. |
Install the lower crankcase bolts, in several passes, in sequence as shown.
Check that the crankshaft turns smoothly. |
| 8. |
Check the crankshaft end play. |
| 9. |
Assemble the other parts in the reverse order of disassembly. |
|
 Crankshaft Components and Components Location
Components
1. Crankshaft upper bearing2. Crankshaft thrust bearing3. Crankshaft4. Crankshaft lower bearing5. Crankshaft position sensor (CKPS) wheel6. Lower crankcase7. Gasket
...
 Cylinder Block Repair procedures
Disassembly
•
Use fender covers to avoid damaging painted surfaces.
•
To avoid damaging the cylinder head, wait until the engine
coolant temperature drops belo ...
Other information:
Hyundai Elantra AD (2016-2020) Service Manual: Crankshaft Components and Components Location
Components
1. Crankshaft upper bearing2. Crankshaft thrust bearing3. Crankshaft4. Crankshaft lower bearing5. Crankshaft position sensor (CKPS) wheel6. Lower crankcase7. Gasket
...
Hyundai Elantra AD (2016-2020) Service Manual: Valve Body System
Components and Components Location
Components Location
1. Automatic transaxle2. Input/Output speed sensor3. Valve body assembly4. Solenoid valve connector module5. Valve body cover6. Gasket
Valve Body Description and Operation
Description
The valve body is essential to automatic transaxle ...
© 2018-2026 www.helantraad.com
